Follow these steps to create, edit, and distribute a Brand Update email newsletter.
The Newsletter Studio module will appear in the Section bar (if you have permission to access it).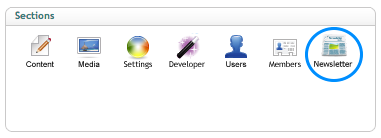
To create a new newsletter, simply select one of the blank templates in the Newsletters > Draft folder. Right-click an existing draft and select ‘Copy to new’, so you don’t overwrite the template.
Type the name of the new newsletter and click ‘Create’. The new name identifies your different email communications in the newsletter list. Ensure the name is relevant and easily recognisable. E.g. ‘Brand Update - New signage section’.
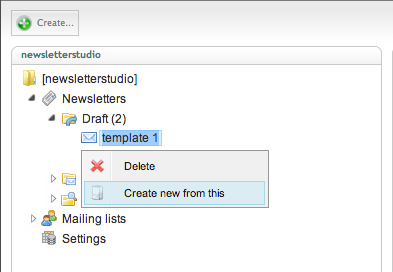
Select your newly created draft copy to begin editing content.
You edit the contents of the newsletter as you would a standard guidelines page. After you have finished writing the content and added all your text, links and images, you are ready to send the newsletter.
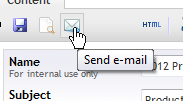
- You will notice the Name field is already populated. This is an internal reference to easily identify the email campaign.
- Type the Subject of the email. This is the subject line that will appear when recipients receive the email in their inbox.
- Use the Sender e-mail address assigned at setup. This is the email address that will appear in the From Email Address field in the recipient's inbox. This is typically a generic mail account and can be edited. However, note that using your email or your business’s email address might result in your business’ email server blocking the email, as it detects the email is not being sent from their internal mail server. For more info, speak to your Brand Toolbox administrator.
- Save your changes using the save icon.
Save, preview and send e-mail
In the ‘Newsletter’ send panel, you have three choices: Save, Save and preview and Send e-mail.
Save
Save will save any changes made in the draft and allow you to finish and send the email at a later date. Saving will not distribute the email.
Save and preview
Always do a Save and preview before distributing to ensure the newsletter is rendered properly by typical email browsers and all included links/images are displayed correctly.
A popup will appear with a rendered copy of your draft. If any changes need to be made, close the popup, make the change and select ‘Save and preview’ to see the changes made.
Send e-mail
Once you are happy with the newsletter content, you are ready to distribute the email campaign. In the panel, select Send e-mail.
A popup will appear prompting you with three options:
- Send out a test mail – This will show an additional text field and allow you to enter one email address. When Confirm is clicked, a preview email will be sent directly to the email entered.
Note: Allow up to five minutes for the email to reach the mailbox of the entered recipient. - Send the newsletter now – This will allow you to send the email to individual Member Groups. When this option is selected, an additional drop-down menu will appear listing all your member groups. Select the member group and upon confirmation, the email will be distributed to that group. If you wish to send to multiple groups, you need to repeat this process.
Note: Allow up to five minutes for the email to reach the mailbox of the entered recipient. Note also that the recipient’s name will not be displayed in a preview email. - Schedule a mail out – You can schedule an email to be distributed to a specific member group at a certain date and time. This may be helpful to automatically distribute emails on the date of a new brand/product launch.
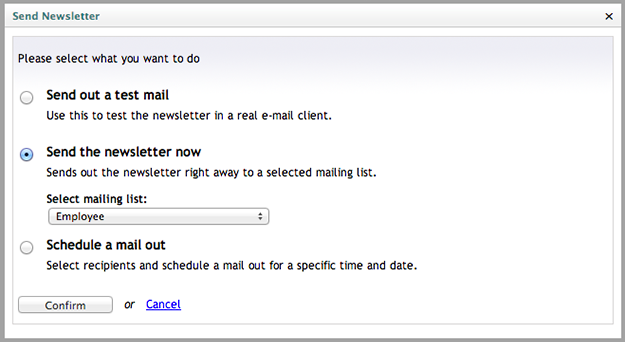
Note: Wait until the dialog box tells you that it has sent before closing the page, as send times depend on size of member database.
Sent emails and archiving
All sent newsletters are moved to the ‘Sent’ folder in the structure tree. When the message is older than 90 days, it is moved automatically to the ‘Archive’ folder.
Clicking on a newsletter brings up the following analytics dashboard.
Newsletter reporting
Newsletter campaigns can be tracked with our web reporting and analytics tool: Newsletter studio. View more information on the Newsletter reporting page.
Duplicate a sent email campaign
To duplicate (copy) a sent email campaign, select it from either the ‘Sent’ or ‘Archive’ folders.
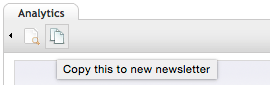
Click the ‘Copy this to new newsletter’ icon in the ‘Analytics’ tab (see below).
Type in the new Newsletter name and click ‘Create’. The new newsletter will be placed in the ‘Draft’ folder of the ‘Newsletters’ folder.
Next page: Newsletter reporting
Back to top