‘Public access’ privileges allow you to define who sees a particular page or section of the site.
Note that this feature also controls who sees images in the Image library of Brand Toolbox v3.0. Later versions (v3.1 onwards) are configured prior to handover.
![]()
Default settings
By default, Brand Toolbox makes all pages available to ‘Employee’ and ‘Non-employee’ Member Groups. Unless you specifically change this setting, all underlying folders and pages inherit these access privileges. Note that you only need to change these settings when you want to block individual member groups from viewing specific content.
Restricting access to pages
You may decide to restrict access to a page so it is viewable by ‘Employee’ member groups only. For example, you may have an internal comms page such as ‘Internal corporate letterheads’, and wish to exclude 3rd party or external suppliers (ie. Non-employees) from viewing the page.
To restrict access to the ‘Employee’ member group only, follow the procedure below:
- Right-click a page/folder item (node) in the Content tree and select the Public access option in the actions/context menu.
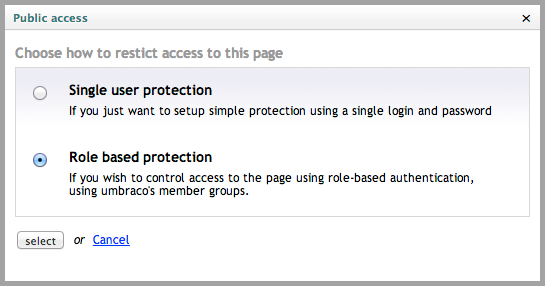
- The Public Access dialogue box appears.
- Select the Role based protection radio button and click Select.
- You will be presented with the Public access – Role based protection dialogue box. Select the member groups that have access to this area of the site. You will see a list of all of the member groups for your site in the left hand list. You can use the ( >> ) or ( << ) buttons to move these groups to and from the right hand list. For an ‘Employee’ group user to be able view the page, it must appear in the right hand list.
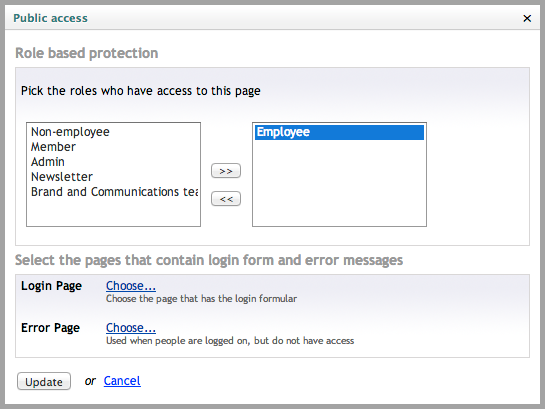
- Specify the Login Page where site users can enter their login details. If a user attempts to browse to the protected area of the site without first entering their login details, then they will be bounced to this page on your site:
- Choose the provided login page: Content > Login
- Specify the Error Page. This is the page that users are bounced to when they log in using the incorrect credentials:
- Choose the provided error page: Content > Brand Toolbox > Error
- The dialog box should now have the following settings:
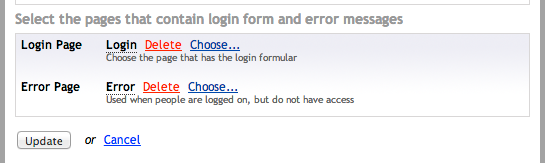
- Click the Update button to save your changes.
Note: Users who do not have permission to view a page or section will not see the link in the navigation menu.
Image and Asset restrictions and access
Setting restrictions and access for images and assets are handled differently than page permissions.
View the links below to read more: