All members are required to log into the system with a username (email address) and password.
The following table describes the Member Group roles of a typical (default) installation:
| Member Group | Description of role |
|
Employee |
Who: Employees are staff members of the company (either full time, part time or contractual) and must have a valid company email address (ie. @companyemail.com). Employees can generally view all content, images and assets across the site (unless specifically restricted from some ‘Brand/Marketing team-only’ pages or content. Approval process: Automatic (email validation only). Expiry: Access does not expire. Access can be deactivated by IT Support on member leaving the business. |
|
Non‑employee |
Who: Non-employees are external contractors or 3rd party suppliers who wish to gain access to the site but do not have a company email address. Non-employees may be excluded from viewing content, images and assets that are for internal-use only (ie. company letterheads). Note: By default, any new content created is visible to non-employees. Approval process: Automatic email validation) then Manual. Expiry: The ‘Access Administrator’ to manually set expiry date when approving applicant. |
|
Brand / |
Who: Internal Brand, Marketing or Communications team member with access to privileged content, images and assets across the site (if adopted). Approval process: Automatic (email validation) then Manual. Expiry: Access does not expire. |
|
Auxiliary roles... |
|
|
Member |
Who: All members who register to Brand Toolbox are automatically assigned the ‘Member’ role. It allows Brand Update newsletters to be sent to all ‘Members’ rather than specific member groups. Approval process: Automatically added for all registrations. However, if manually adding a member to the backoffice, the ‘Member’ role will need to be manually added to the ‘Member Group’. Note: Do not remove from member profile. |
|
Registration Request Approver |
Who: This role is manually assigned and added to the member who approves registration requests. Note: Member must be logged into the frontend to approve registration requests. |
|
Image Request Approver |
Who: This role is manually assigned and added to the member who approves image requests. Note: Member must be logged into the frontend to approve image requests. |
* A note about Member Groups for the Brand Toolbox team:
A member can only be part of an ‘Employee’ or ‘Non-employee’ group. They cannot be assigned a combination of these. If multiple groups are added to the member profile, the member will be assigned to a group in the following hierarchical order:
The ‘Admin#’ group has been reserved for allowing all functionality. If the ‘Admin’ account is not present, then the next one in line is the ‘Employee’ account, then ‘Non-employee’. Only one can apply to a page, and the one with the most permissions (based on the above) is allocated.
# The ‘Admin’ group does not always appear in every installation (it is requirements-specific).
The following registration process model applies for both ‘Employee’ and ‘Non-employee’ members:
Step 1 — Email authentication (all members)
- Registration form
A new visitor registers by completing the online registration form. - Email validation
An email is automatically sent to the new registrant to confirm their email address. - Registrant confirms
The registrant clicks the link on the email to confirm verification.
Note: All Employees (e.g. with an ‘@companyemail.com’ email address) are now able to log on. All other registrations proceed to Step 2 below.
Step 2 — ‘Access Administrator’ approval
- Final access approval email
The ‘Access Administrator’ is automatically sent an email notifying them whenever a new registration has cleared the (Step 1 – Email authentication) process above.
Note: The ‘Access Administrator’ is the company representative chosen to approve registrations. It is the Access Administrator’s role to check the validity of the person requesting access to the system. They can do this by email/phone call to the ‘Referrer’ or by ringing the registrant directly for confirmation. - Administrator membership approval
After verifying the registrant with the ‘Referrer’, the ‘Access Administrator’ approves the new registrant via dynamic email link. The ‘Access Administrator’ can also set the expiry date when approving the applicant.
Note: The ‘Referrer’ is the company staff member/employee who has guided or instructed the external contractor or 3rd party supplier to view the site. If ‘Referrers’ are asking external users to use the system, they should instruct the ‘Non-employee’ registrants to include them as the ‘Referrer’ on the registration form (when asked). - Final email approval
As soon as the ‘Access Administrator’ clicks the APPROVE button, the new member is sent an email informing them that they can now enter the system.
*Note: If the Access Administrator does not receive the final access approval email, please follow the steps below to manually approve a registration.
Manual approval
Manually approving a registrant/member
If the Access Administrator does not receive the final access approval email or if a registration approval is needed urgently, the Access Administrator can manually approve the new registrant as follows:
- Go to the Members section of the Admin area.
- Find/select the new registrant (alphabetically sorted by ‘Firstname’ in the Members folder).
- Select the ‘Properties’ tab.
- For a member to be active and a registration approved, all of the following three fields must be checked (per the visual below):
• Verified — Indicates the application has passed email authentication.
• ApprovedReferrer — (No longer required. This is legacy code.)
• ApprovedAdmin — Indicates the ‘Access Administrator’ has approved the registration.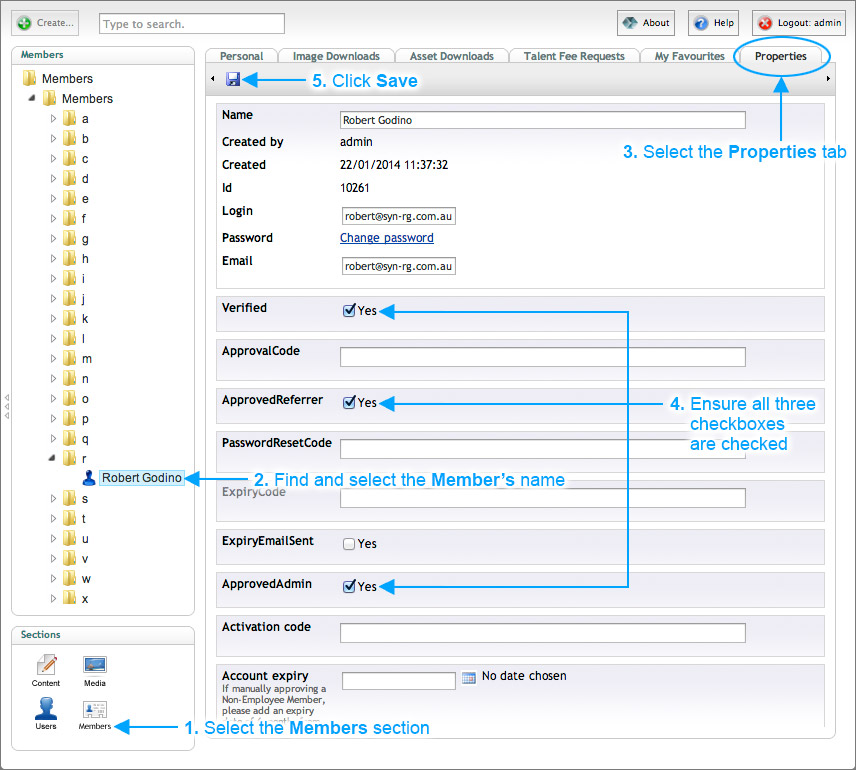
- Click SAVE.
*Note that when manually approving a user with the process above, the registrant does not receive a confirmation email, so ensure you let them know (via email) that their application has been approved.
Escalating member status from ‘Employee’ to ‘Brand/Marketing team’
To escalate the status of an already registered ‘Employee’ to a ‘Brand/Marketing team’ Member Group type, follow the instructions below:
- Go to the Members section of the Admin area.
- Find/select the new registrant (alphabetically sorted by ‘Firstname’ in the Members folder).
- Select the ‘Properties’ tab.
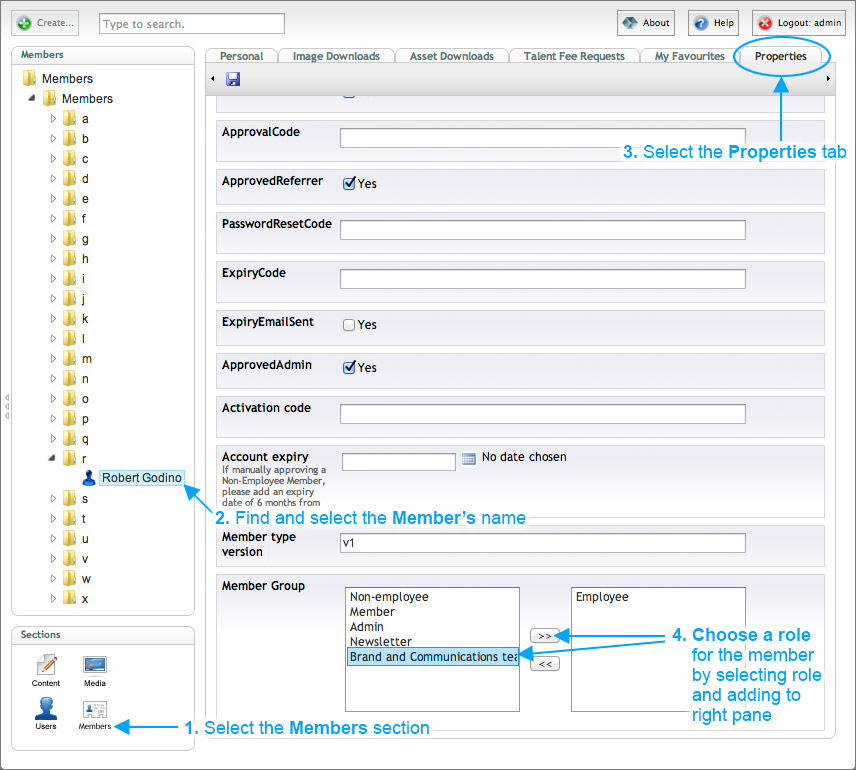
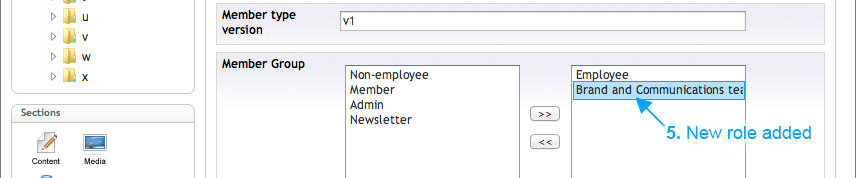
- Choose the ‘Brand and Comms team’ role for the new member from the Member Group panel by selecting the role in the left pane and moving it to the right pane with the (>>) button.
- After the new role has been added, remember to click SAVE.
Next page: Troubleshooting member access
Back to top