All members are required to log into the frontend site with either a username (email address) and password, or via Single Sign-On (SSO).
Depending on your configuration, member access is typically restricted to 1 of 3 registration (access) workflows:
- Registration requires approval – Employee and/or External Supplier^ members groups
- Registration does not require approval – Employee member groups only
- Single Sign-On (SSO) – Employee member groups only
The following table briefly describes each of the different Member Group roles of a typical installation, however, you may have as many different internal or external member group combinations as you wish.
Note that member group names must not contain special characters, e.g. # " ' ( ) [ ] + ! / : ; ` etc.
| Member Group | Description of role |
|
Employee |
Who: Employees are staff members of the company (either full time, part time or contractual) and must have a valid company email address (e.g. @companyemail.com). Employees can generally view all content, images and assets across the site, unless specifically restricted from some ‘Brand Team Admin-only’ pages or content. Access / Registration workflow: Can be either: Expiry: By default, expiry is set to 12 months but is configurable to any time period. For registrations requiring approval, this time period can be altered by the ‘Access Administrator’ when they approve the application (e.g. they can restrict access to 1 week, if desired). There is no expiry period set for the Single Sign-On workflow, as access is disabled automatically when a member leaves the company. |
|
External Supplier |
Who: External Suppliers or Non-employees (name may vary) are external contractors or 3rd party suppliers who wish to gain access to the site but do not have a company email address. External Suppliers may be excluded from viewing content, images and assets that are for internal-use only (e.g. company letterhead, email signatures etc). Note that by default, any new content created is visible to suppliers unless specifically restricted. You can have as many different external member groups as you wish (e.g. External agencies, Designers, Suppliers, Contractors, Photographers etc). Access / Registration workflow: Expiry: By default, expiry is set to 12 months but is configurable to any time period. Additionally, this time period can be altered by the ‘Access Administrator’ when they approve the application (e.g. they can restrict access to 1 week, if desired). |
|
Who: Brand Team Admins are the core internal Brand, Marketing or Communications Team members (name may vary) charged with administering the site. Brand Team Admins can view all content, images and assets that Employees can access but may also have access to privileged content, images and assets across the site. They are also responsible for approving registration and image requests but must be logged into the frontend to approve the requests. Access / Registration workflow: Same as Employee, however, if following the “Registration does not require approval” workflow, the registrant will need to register as an Employee and must be manually escalated to this Member Group via the backoffice admin area Can be either: Expiry: By default, expiry is set to 12 months but is configurable to any time period. For registrations requiring approval, this time period can be altered by the ‘Access Administrator’ when they approve the application (e.g. they can restrict access to 1 week, if desired). There is no expiry period set for the Single Sign-On workflow, as access is disabled automatically when a member leaves the company. |
|
|
Other Employee Groups / Teams |
Who: You can have as many different internal member groups or teams as you wish. E.g.
For more info on configuring multiple teams across your site, contact the Brand Toolbox support team. |
|
Auxiliary roles... |
|
|
Member |
Who: All members who register to Brand Toolbox are automatically assigned the ‘Member’ role. It allows Brand Update newsletters to be sent to all members rather than specific member groups. Access / Registration workflow: Automatically added for all registrations. However, if manually adding a member to the backoffice, the ‘Member’ role will need to be manually added to the ‘Member Group’. Note: Do not remove from member profile. |
^ A note about Member Groups for the Brand Toolbox team. A member can only be part of an ‘Employee’ or ‘External Supplier’ group. They cannot be assigned to both.
The following registration workflow applies to both ‘Employee’ and/or ‘External Supplier’ members.
Registration and login requires a username (email address) and password as per the following...

Step 1 — Email authentication
- Registration form
A new visitor registers by completing the online registration form. - Email validation
An email is automatically sent to the new registrant to confirm their email address. - Registrant confirms
The registrant clicks the link on the email to confirm verification.
Step 2 — ‘Access Administrator’ approval
- Final access approval email
The ‘Access Administrator’ is automatically sent an email notifying them that a new registration has cleared the above (Step 1 – Email authentication) process.
Note: The ‘Access Administrator’ is the company representative (usually from the ‘Brand Team Admin’ member group) chosen to approve registrations. It is the Access Administrator’s role to check the validity of the person requesting access to the system. They can do this by email/phone call to the ‘Referrer’ or by ringing the registrant directly for confirmation. - Administrator membership approval
After verifying the registrant with the ‘Referrer’, the ‘Access Administrator’ approves the new registrant via the email link. The ‘Access Administrator’ can also adjust the default expiry date when approving the applicant.
Note: The ‘Referrer’ is the company staff member/employee who has guided or instructed the external contractor or 3rd party supplier to view the site. If ‘Referrers’ are asking external users to use the system, they should instruct the ‘Non-employee’ registrants to include them as the ‘Referrer’ on the registration form (when asked). - Final email approval
As soon as the ‘Access Administrator’ clicks the APPROVE button, the new member is sent an email informing them that they can now enter the system.
*Note: If the Access Administrator does not receive the final access approval email, please follow the steps below to manually approve a registration.
The following registration workflow applies to ‘Employee’ members only.
Registration and login requires a username (email address) and password as per the following...
Step 1 — Email authentication
- Registration form
A new visitor registers by completing the online registration form. - Email validation
An email is automatically sent to the new registrant to confirm their email address. - Registrant confirms
The registrant clicks the link on the email to confirm verification. - Registration success
The new registrant is redirected to the login page and now able to log on.
The following SSO workflow applies to ‘Employee’ members authenticated via Azure AD (SAML^^).
Registration is not required.
As long as the employee is logged into the company’s Azure Active Directory^^ authentication mechanism, access is instantly granted by clicking the SIGN IN button shown below...

If not logged into the company network, the member will be directed to Microsoft’s login page** to connect. Once logged into the company network, the member is redirected to the home page.
^^ Applies to Azure AD, SAML or any other SSO authentication method.
** Or whichever Active Directory method used by the company.
Manually approving a registrant/member
If the “Frontend” Access Administrator MEMBER does not receive the final access approval email (to approve a registration) or if a registration approval is needed urgently, the “Backoffice” Access Administrator USER can manually approve the new registrant as follows:
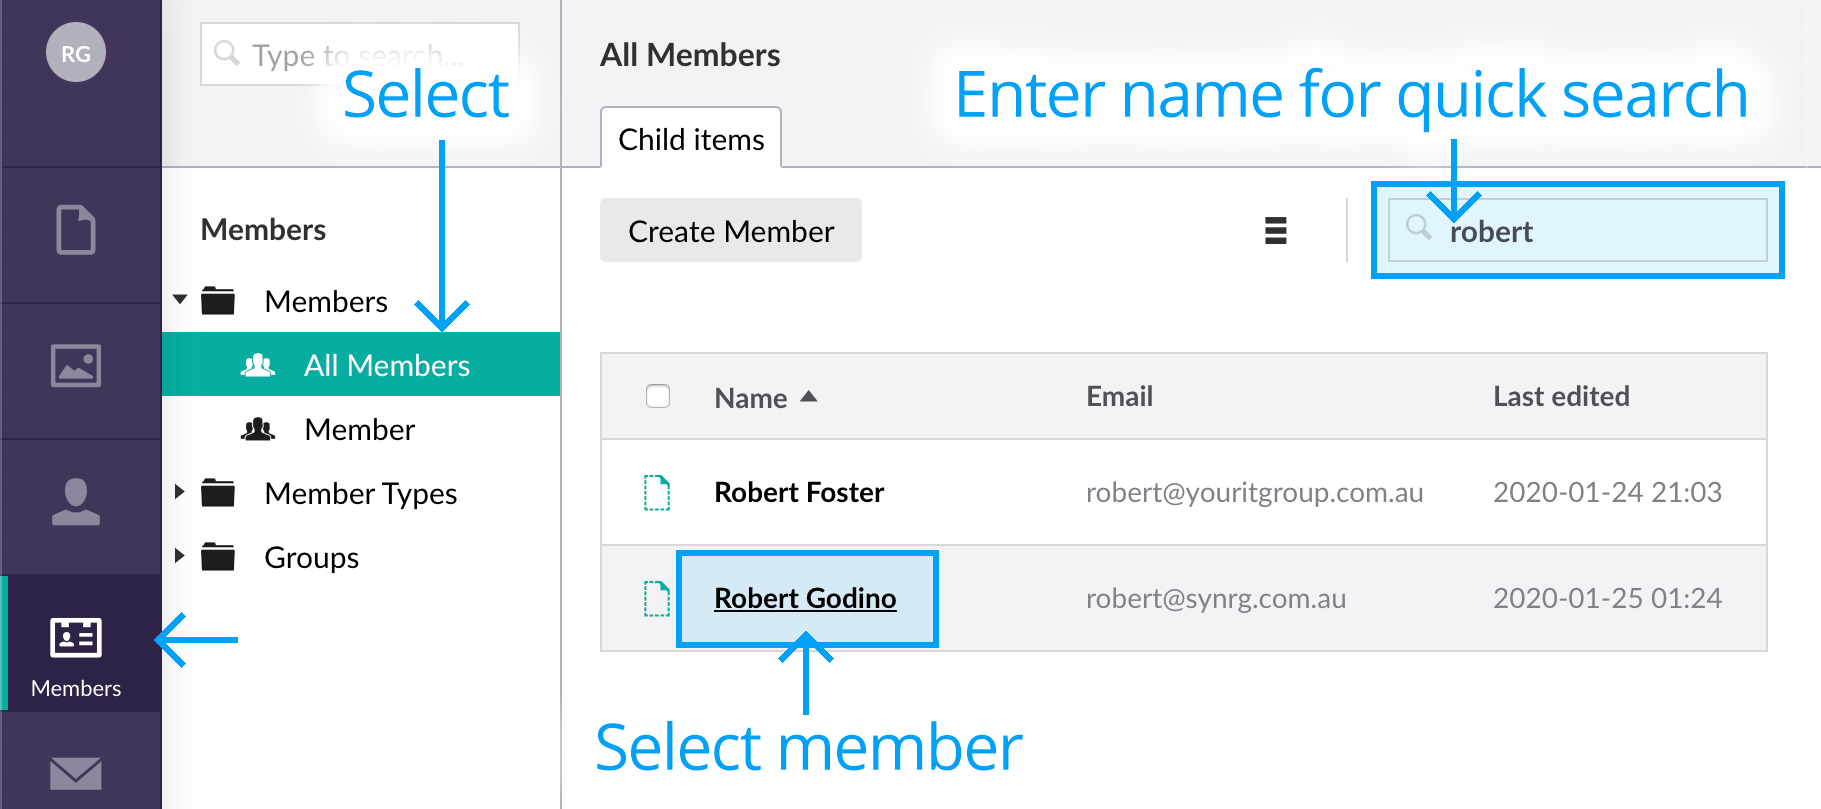
- Go to the Members section of the Admin area and select All Members.
- Enter name in the search field to quickly find the member. The list is sorted alphabetically by ‘Firstname’. Select the member.
- Select the ‘Properties’ tab.
- For a member to be active and a registration approved, the following two fields must be toggled on:
• Verified — Indicates the application has passed email authentication.
• Is Approved — Indicates the ‘Access Administrator’ has approved the registration or that the approval was allotted automatically based on assigned member workflow.
Additionally, the following two properties must meet this criteria:
• Account Expiry — Ensure the date has not expired and adjust accordingly.
• Is Locked Out — Ensure the account is not locked. This can occur after five^ (5) successive unsuccessful password attempts. If locked out, simply toggle on ‘Is Approved’.
^ Number may differ for each customer (default=5). Can adjust in web.config: maxInvalidPasswordAttempts="5".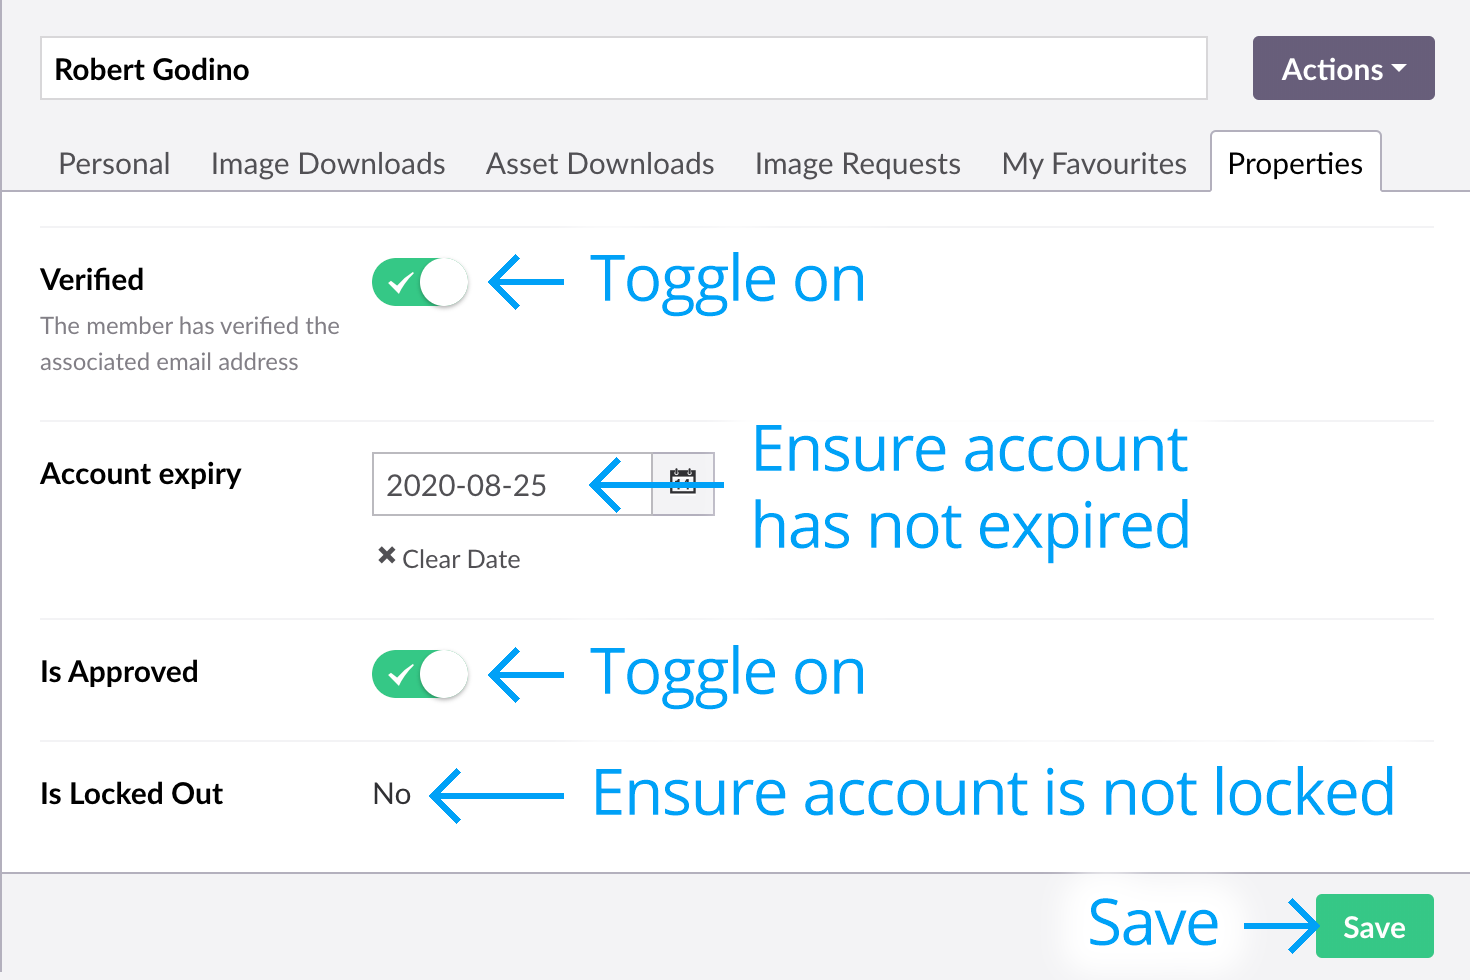
- Click SAVE to enable account.
* Note that when manually approving a user with the process above, the registrant does not receive a confirmation email, so ensure you let them know (via email) that their application has been approved.
Escalating member group from ‘Employee’ to ‘Brand Team Admin’
To escalate the status of an already registered ‘Employee’ to a ‘Brand Team Admin’ Member Group type, follow the instructions below:
- Go to the Members section of the Admin area and select All Members.
- Enter name in the search field to quickly find the member. The list is sorted alphabetically by ‘Firstname’. Select the member.
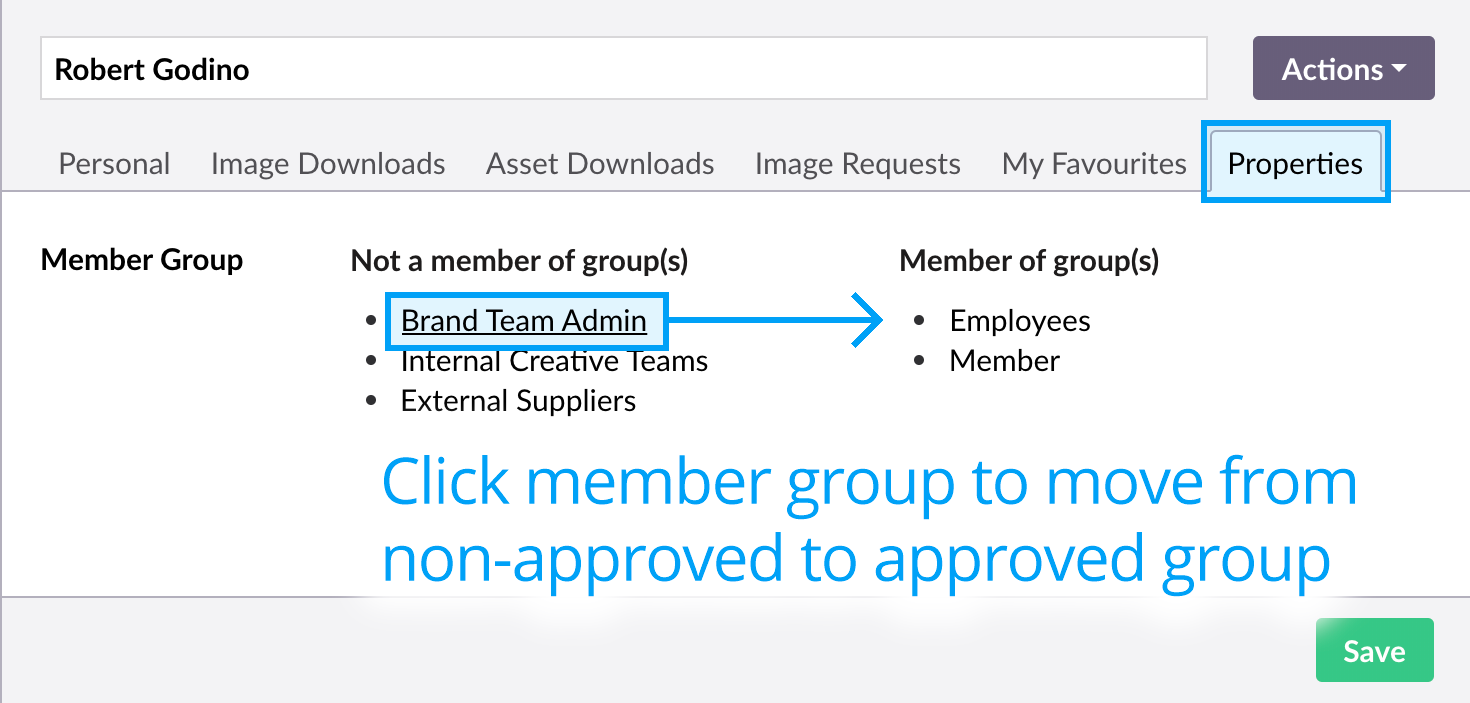
- Select the ‘Properties’ tab.
- Click the ‘Brand Team Admin’ member group to move the member group from the ‘non-approved’ list...
... to the ‘approved’ list.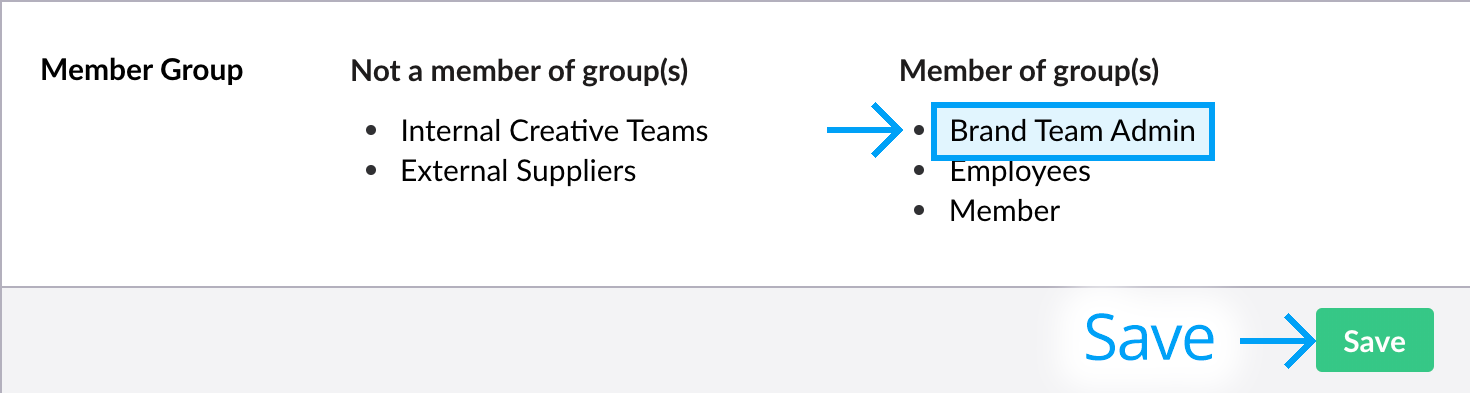
- The member is now assigned to the chosen group. Click SAVE to enable changes.
Note: To remove a member from a member group, just click the member group in the ‘approved’ list so it appears in the ‘non-approved’ list.
Last updated: 6 February 2020
Next page: Manually approve a member
Back to top