Brand Toolbox can automatically and sequentially number images (see Automated image numbering), so there is no need to individually and manually name the files. Images can be uploaded individually or in batches.
Note: The Image library only accepts JPG files. Files must be converted to JPG before adding to the library. Photoshop (PSD) and EPS files are considered document assets and should be uploaded to the Asset library as artwork or document files.
The image Batch Uploader should always be used per the instructions below:
Batch uploading multiple images
- In the Media > BT Image library folder, select the folder where you would like to upload your images.
- In the right hand edit pane, under the Contents tab, click the Upload... icon. The ‘Drag files here to upload’ dialog box will appear.
- Add files by clicking the ‘Choose Files’ button or simply drag ‘n’ drop multiple files from your desktop onto the upload dialog box.
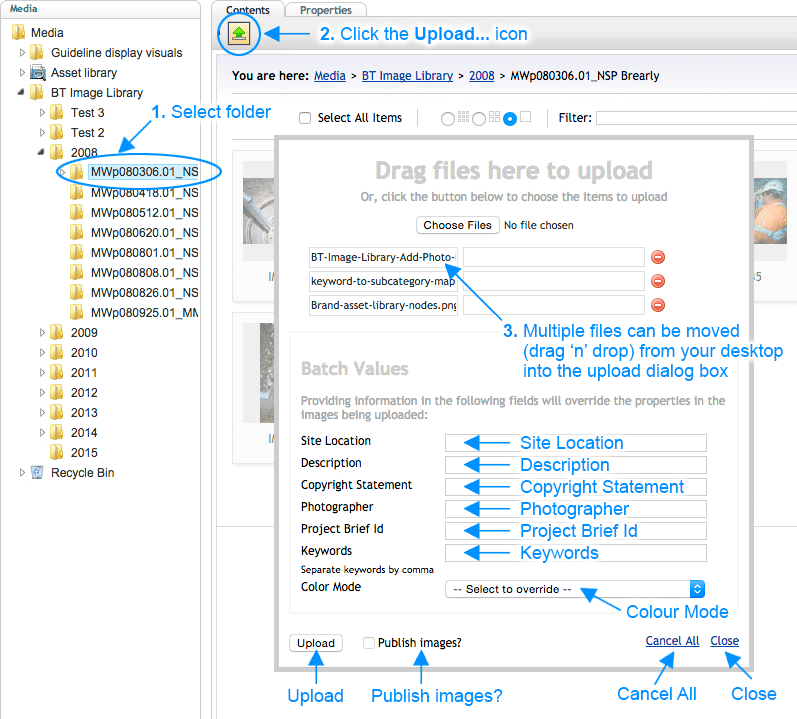
The following table describes each of the different Batch Values and how they function on upload. Note that entering data in the fields will overwrite any existing data.
| Batch Values | Description |
|
Site Location |
Free text field. No GeoLocation capability. Remains blank if left blank. |
|
Description |
Automatically extracts data from the image’s IPTC ‘Caption/Description’ metadata, if the element exists. |
|
Copyright Statement |
Automatically includes ‘© Brand Toolbox’ by default to watermarked images. If adding an alternative statement, please precede with the © symbol. |
|
Photographer |
Automatically extracts data from the image’s IPTC ‘Creator’ metadata, if the element exists. |
|
Project Brief Id |
Add a project brief or photography brief number (optional). |
|
Keywords |
Automatically extracts data from the image’s IPTC ‘Keyword’ metadata, if the element exists. Separate, keywords, and phrases, by, comma. |
|
Color Mode |
If no colour is selected or detected, ‘Colour’ will automatically be added to the element. Ensure you select ‘Black and White’ for historic Black & White and greyscale/sepia-toned images. |
|
Upload |
Uploads the image files added to the Batch Uploader. |
|
Publish images? |
Checking this box publishes the images and makes them available in the Image library frontend for viewing. |
|
Cancel All |
Closes the dialog box and removes the images added to the Batch Uploader. |
|
Close |
Closes the dialog box but keeps a record of the images added to the Batch Uploader. Added images will appear next time the Batch Uploader is accessed. |
Publishing an image
For an image to appear in the Image library frontend, it must be published. Images can be published individually or in batches by setting the Published toggle to ‘Published’.
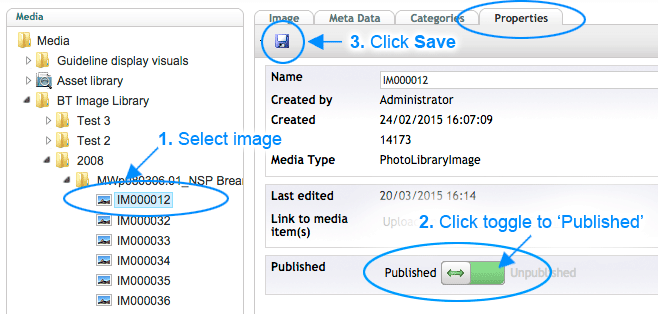
To publish the image and make it available in the frontend:
- Select the image in the Media section.
- Select the ‘Properties’ tab and click the toggle to Published.
- Remember to click the Save button.
Next page: Batch modifying images
Back to top