Here are a few helpful hints and tips to start working with Brand Toolbox more efficiently.
On this page:
- Reload nodes
- Recycle Bin
- Filenaming conventions
- Creating permanent and shareable links (permalinks)
- Sharpening guidelines display images
Reload nodes
![]()
When editing and saving content, the content tree will generally refresh itself. However, if the tree doesn’t refresh or if multiple editors are working on the site (and you want to see their changes loaded into your content tree), you can do this by reloading all or parts of the content tree.
To reload a section of the content tree, simply right-click the item in the tree and choose the Reload nodes option from the actions menu (pictured above). Choosing this option causes the content tree to refresh itself, and any child nodes to reflect any new changes.
Recycle Bin
![]()
Emptying the Recycle Bin — It is possible to permanently empty the entire contents of the Recycle Bin. However, note that once the Recycle Bin has been emptied, pages cannot be restored (if errors are made).
Though we provide guidance on how to Empty the Recycle Bin, we strongly suggest it is never emptied, as items left in the Recycle Bin can be restored.
Note also that items in the Recycle Bin are automatically deleted after 30 days.
Filenaming conventions
It is important that consideration is given to filenaming before uploading files to the system.
For more information on best practice filenaming conventions, visit the Filenaming section on the Media management in Brand Toolbox page.
Refreshing browser cache
Why clearing or refreshing your cache?
Your browser has a folder that stores previously downloaded items for future use. Graphic images (such as buttons and icons), photos, and even entire web pages are examples of items which are saved or cached. When visiting a web page, your browser checks if a copy of the page files is already in its cache. If so, it will save the visitor some downloading and make web pages load faster. Some browsers refer to it’s cache as Temporary Internet Files.
Cache refresh
There are some situations when bypassing your browser’s cache is preferred. Just clicking the refresh button (or hitting F5) won’t be sufficient in this case, because this reloads the web page while still using the old files from the cache. You need to refresh your cache first!
The following link contains step-by-step guides to clear your browser’s cache, forcing it to download all the latest data from a website: http://refreshyourcache.com
Linking direct to Asset groups, Brands and Keyword queries in the Asset library
Brand Toolbox allows you to create filtered links direct to Asset groups, Brands, Keywords and Category queries within the Asset library.
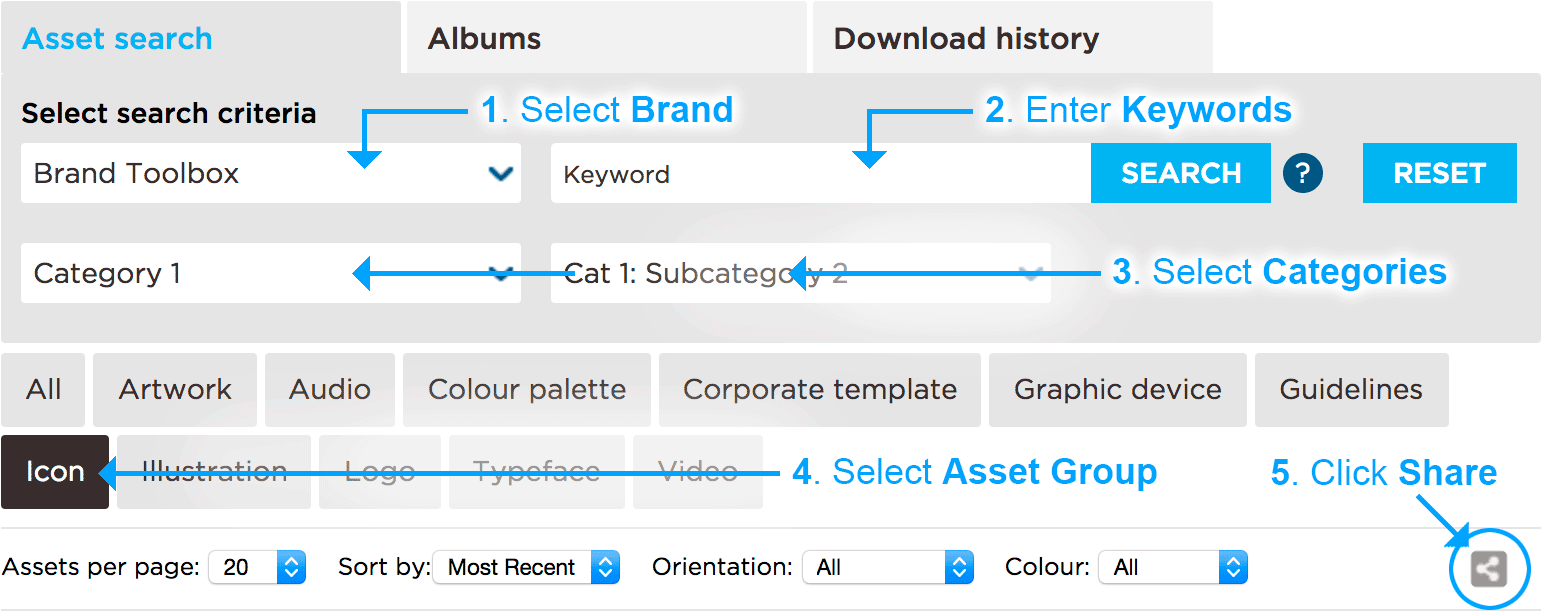
The simplest way to do this is to filter your Asset library search, per the following:
- Select Brand
- Enter Keywords
- Select Categories / Sub categories
- Select Asset Group
- And click the Share icon
 .
.

The URL of the querystring is copied for you. You can share this or attach the ‘?’ to the end of a hyperlink.
For example, based on the selections above, the following URL is returned:
~/asset-library/?brand=Brand+Toolbox&query=Keyword&
category=40109&subcategory=40110&format=Icon
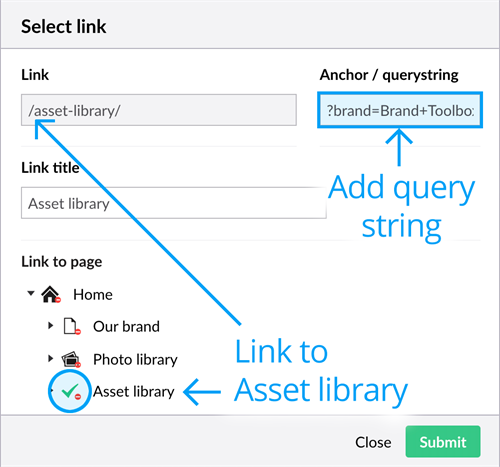
Therefore, to create a hyperlink within a Brand Toolbox guidelines page to this search query, simply link to the Asset library:
/asset-library/
Then add the search querystring “?brand=Brand+Toolbox&query=Keyword&…” to the ‘Anchor / querystring’ field.
For a lesson on hyperlinking, go to: Rich text editor > Links.
Querystring definitions
The querystrings relate to the following properties and filtering options:
- brand= Brand
- query= Keyword
- category= Category level 1
- subcategory= Category level 2
- format= Asset group
- orientation= Portrait, Landscape, Square
- colour= RGB, CMYK, PMS, Black etc
- assetUsageType= Usage type (e.g. Restricted use, Copyright etc)
- sortBy= Sort order (alphabetical, most recent etc)
- itemsPerPage= Number of items per page
- page= Page number
- status= Published, Unpublished or Archived
Note: You obviously do not need to add all these search queries. If you just want to filter to the “Brand” and nothing else, just add the “?brand=” querystring:
/asset-library.aspx?brand=Brand+Toolbox
And if adding multiple querystrings, rememebr to add “&” between them. E.g.:
/asset-library.aspx?brand=Brand+Toolbox&format=Icon
Linking direct to Keyword, Category and other search queries in the Photo library
As detailed above, you can also hyperlink directly to saved search queries within the Photo library.
Image library query string definitions:
- category= Category level 1
- subcategory= Category level 2
- query= Keyword
- itemsPerPage= Number of items per page
- sortBy= Sort order (alphabetical, most recent etc)
- page= Page number
- details= Details (on/off)
- zoom= Preview Zoom (on/off)
- colour= Colour or Black and White
- orientation= Portrait, Landscape, Square
- usage= Usage type (e.g. Restricted use, Copyright etc)
- photographer= Photogapher
- year= Date (Year)
- status= Published, Unpublished or Archived
Creating permanent and shareable links (permalinks)
Images and assets can be shared with external users (general public) via the share link.
Members can share individual or multiple assets by selecting the asset or collection, creating a shareable link and emailing the link to others. The assets can then be accessed by non-registered users.
The share links can be created in either the Asset/Photo libraries or by opening the asset details screen:
- Via the Asset or Photo library screens:

- Via the asset/image’s details screen:

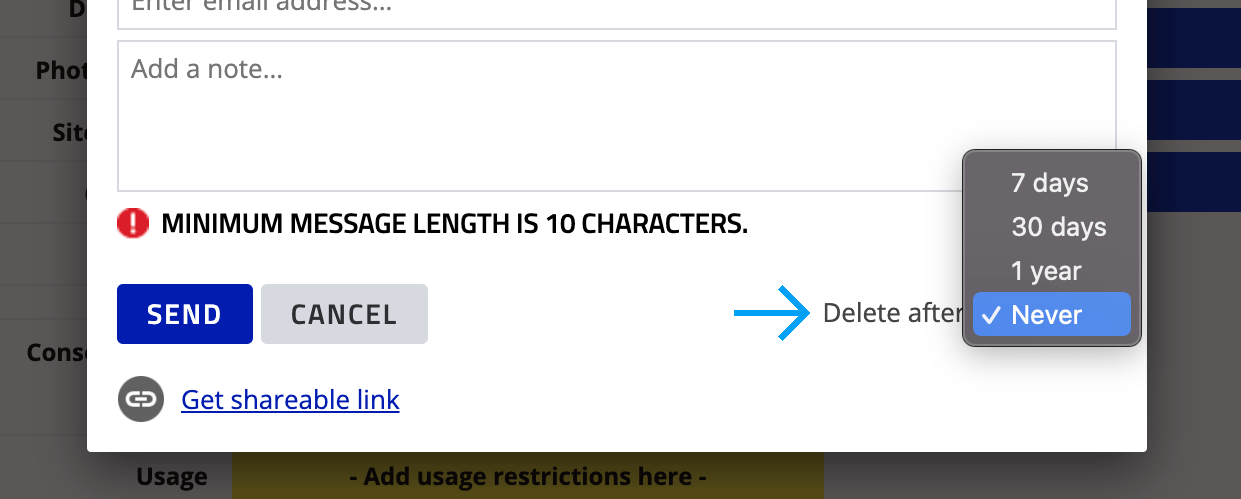
Click either the ‘Share selected’ or ‘Share image/file’ button, select ‘Delete after: Never’ and email the link to others.

Selecting “Never” acts as a permalink (perma-link) to the asset. However, note that if the asset is versioned up to a new version, the shareable permalink will link to the new version of that asset.
Note also that assets and images can also be shared for 7 days, 30 days or 1 year.
Bold and italics
Depending on the sequence of when Bold or Bold Italic styling is applied to text, the system may incorrectly show formatting on the frontend pages, though they appear correct in the backend content editor.
This is because the HTML must show <strong> tags (ie. Bold) wrapped around the <em> tags (ie. Italic). Therefore for Bold Italic to appear bold and italicised, the HTML must read:
<strong><em>Bold Italic</em></strong>, AND NOT
<em><strong>Bold Italic</strong></em>
If the tags are mixed around, simply click the HTML icon ![]() in the rich text editor and correct the tag order manually.
in the rich text editor and correct the tag order manually.
Sharpening guidelines display images
When images are included in guidelines page content, the set pixel width and height is automatically replicated in the image’s source path in the format “?width=630&height=200”. E.g.
<p><img style="width: 630px; height: 200px;" src="/media/759889/brandmark.png?width=630&height=200" alt="Brandmark" /></p>
This replication of the width and height causes images to soften and to not appear sharp. To correct this, remove the question mark ? and the width and height that follow it, taking care not to delete the trailing ", as it is required.
<p><img style="width: 630px; height: 164px;" src="/media/755881/brandmark.png" alt="Brandmark" /></p>
This procedure will sharpen the image.
Last updated: 10 January 2024
Next page: Site settings
Back to top