From 1 July 2023, Google Analytics’ original method of collecting data, Universal Analytics, will no longer process new data. After this date, only the next-generation Google Analytics 4 measurement solution can collect data.
To preempt the change, the Brand Toolbox team has already configured your new Google Analytics 4 property.
On 6 February 2023, we switched data collection from the old Universal Analytics property to the new Google Analytics 4 (GA4) property — and only the new GA4 property is now collecting data.
Click here for more info
Contents
- Access your Google Analytics 4 property
- View customised “Search” dashboards
- View Page Views and Engagement Time
- View User & Traffic Acquisition
Log into Google Analytics and select the new Google Analytics 4 property assigned to you. Note that you may see two properties:
- the existing Universal Analytics property (tagged with UA), and
- the new Google Analytics 4 property (tagged with GA4).
E.g.
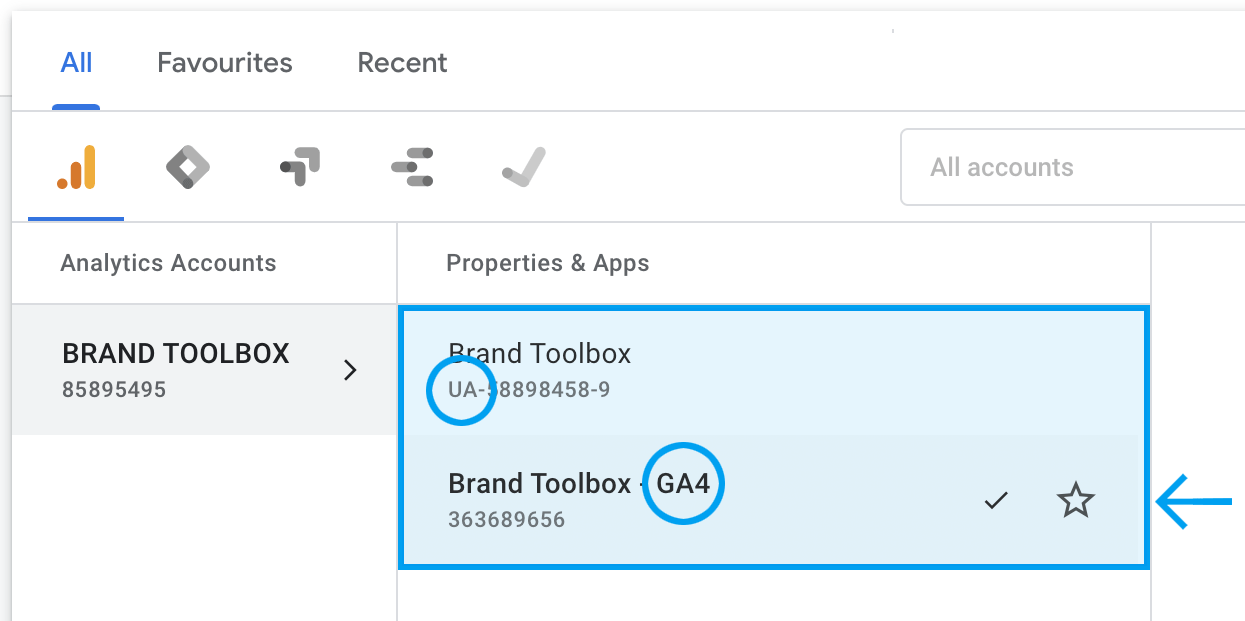
Select the property marked with “GA4” in the name — this is the new Google Analytics 4 property.
If you cannot see the Brand Toolbox “GA4” property in your Google Analytics account, then you haven’t been assigned to it yet. Contact the Brand Toolbox support team to request access: info@synrg.com.au
Google Analytics 4 – Search explorations dashboards
For users unfamiliar with Google Analytics 4, we have provided a suite of customised search dashboards to help you find and view commonly used search terms.
The search dashboards utilise Google Analytics 4’s new “Explorations” reporting mechanism.
To view the dashboards, select “Explore” from the left side menu bar and select one of the explorations^^ provided in the Explorations table:
- Search exploration
- Asset search: File, Brand, Category
- Photo search: Brand, Category
These explorations^^ (reports) have been created for you by the Brand Toolbox team.

^^ If the exploration table is empty, contact the Brand Toolbox support team to make it available to you: info@synrg.com.au
Note that other search explorations (reports) can be created and you aren’t limited to the one(s) provided. For example, you can track and create explorations that capture the File formats (Asset groups), Brands, Categories and Subcategories that are selected in an Asset or Photo library search. After creating these new explorations, give them a name that outlines the properties that are being tracked. For example:
- Asset search: File format, Brand, Category, Subcategory
- Photo search: Brand, Category, Subcategory
We have provided further information on editing the explorations below.
The supplied “Search Exploration” exploration contains four search screens:
- All searches
Combines and displays all the keywords searched across the site. - Page search
Displays the keywords searched within standard Guidelines Pages content. - Photo search
Displays the keywords searched within the Photo library. - Asset search
Displays the keywords searched within the Asset library and the associated “File formats” selected.

Rollover the tabs (as shown above) to view each search exploration.
The supplied “Asset search: File, Brand, Category” exploration contains six search screens:
- Asset search
Displays the keywords searched within the Asset library and the associated “File formats” selected. - File format specific search
Displays the keywords searched within the Asset library and a specific “File format” selected. The example provided is for “Logos”*, however, the filter can be changed to display another file format.
* The value provided is different for each customer. - Brand search
Displays the keywords searched within the Asset library and the associated “Brands” selected. - Brand specific search
Displays the keywords searched within the Asset library and a specific “Brand” selected. The example provided is for “Brand A”*, however, the filter can be changed to display another brand.
* The value provided is different for each customer. Also assumes customer has multiple brands (if not, ignore this tab). -
Category search
Displays the keywords searched within the Asset library and the associated “Categories/Subcategories” selected. -
Category specific search
Displays the keywords searched within the Asset library and a specific “CategorySubcategory” selected. The example provided is for “Category A”*, however, the filter can be changed to display another category.
* The value provided is different for each customer.
The supplied “Photo search: Brand, Category” exploration contains five search screens:
- Photo search
Displays the keywords searched within the Photo library. - Brand search
Displays the keywords searched within the Photo library and the associated “Brands” selected. - Brand specific search
Displays the keywords searched within the Photo library and a specific “Brand” selected. The example provided is for “Brand A”*, however, the filter can be changed to display another brand.
* The value provided is different for each customer. Also assumes customer has multiple brands (if not, ignore this tab). -
Category search
Displays the keywords searched within the Photo library and the associated “Categories/Subcategories” selected. -
Category specific search
Displays the keywords searched within the Photo library and a specific “CategorySubcategory” selected. The example provided is for “Category A”*, however, the filter can be changed to display another category.
* The value provided is different for each customer.
All criteria for viewing the keywords searched across guidelines Pages, the Photo library and the Asset library have been configured for you in the “Variables” and “Tab settings” columns, so you don’t need to edit these. You need only set the “Date range” in the “Variables” column to filter your reporting period^^^.
Duplicate the exploration
^^^ Note that the explorations are shared with you in “read-only” mode. To make changes to the date range, you first need to duplicate the exploration. This allows you to edit the exploration without overwriting the original. You can duplicate the exploration in one of two ways:
- In the Explorations table, click the three vertical dots on the right edge of the “Search Exploration” row and select “Duplicate”.

Rename the exploration to differentiate it from the example provided for you.

- From within the actual Search Exploration, select “Make a copy” at the top-right of the screen.

Rename the exploration to differentiate it from the example provided for you.

Change the date range
Once you have duplicated and renamed your new exploration, you can then change the date range (and share the exploration with others, if you wish).
Choose from the provided date ranges (e.g. Last 7 days, Last 30 days) or enter a Custom date period.

Sorting keywords
The dashboards can be sorted by “most searched” keywords or alphabetically by clicking the “Event count” heading in the table.

Note that you can create your own explorations or edit and extend the filters on the exploration provided for you by adding additional Dimensions and Metrics.
File format search
Linking search terms to the property selections: “File formats (Asset groups)”, “Brands” or “Categories”
As an example, we have provided a new exploration tab named: File format search
The tab only displays the keywords searched under a specific “File format” selected within the Asset library. The example asset file format visualised below is “Logos”, however, it can easily be changed to one of the other file formats:

If, for example, you only wanted to view the search terms entered in a “File format: Pictograms” search, change the “Asset file format” filter in the exploration to match “Pictograms”. You can either duplicate the tab to create a new report or edit the existing “File format search” tab filters in the following way:
-
At the bottom of the “Tab settings” column, click to open the “Asset file format” button in the “FILTERS” panel:

-
Change “Logos” to “Pictograms” or whatever other file format (asset group) you’d like to report on.
-
Click “APPLY” and the report will only reveal the keywords associated to the “Pictograms” selection.
If you wish, you can create a separate exploration tab for each of the file formats or simply modify the filter in the existing tab.
“Brand” and “Category/Subcategory” selections
You can also report on and link search terms to other property selections such as, “Brands”, “Categories” or “Subcategories”, amongst others. The table below outlines all of the available (reportable) properties:
| Dimension name (property/parameter) |
Description |
|
COMMON TO ASSET & PHOTO LIBRARIES: |
|
|
Brand selection |
Records the “Brand” chosen in an Asset or Photo library search. |
|
Category selection |
Records the “Category” chosen in an Asset or Photo library search. |
|
Subcategory selection |
Records the “Subcategory” chosen in an Asset or Photo library search. |
|
Orientation selection |
Records the “Orientation” chosen in an Asset or Photo library search. Currently unconfigured. |
|
Colour selection |
Records the “Colour” chosen in an Asset or Photo library search. Currently unconfigured. |
|
Items per page selection |
Records the “Number of items per page” selected in an Asset or Photo library search. Currently unconfigured. |
|
Sort selection |
Records the “Sorting preference” selected in an Asset or Photo library search. Currently unconfigured. |
|
Status selection |
Records the “Published, Unpublished and Archived status” chosen in an Asset or Photo library search. Currently unconfigured. |
|
ASSET LIBRARY ONLY: |
|
|
Asset file format |
Records the “File format (Asset group)” chosen in an Asset library search. |
|
PHOTO LIBRARY ONLY: |
|
|
Photographer selection |
Records the “Photographer” chosen in a Photo library search. Currently unconfigured. |
|
Year selection |
Records the “Year” chosen in a Photo library search. Note that “Year” signifies the date the photo was taken or created. Currently unconfigured. |
Viewing selected “Categories”
If, for example, you want to view the “Categories” selected in a Photo library search, first decide whether you will edit the existing “Photo search” tab or duplicate it to create a new report.
To duplicate the tab, simply click the arrow next to the tab name and select “Duplicate”.

Once duplicated, you can make changes.
To edit the data viewable in the report, add the “Category selection” dimension to the “Rows” column:
- In the “Tab settings” column, click the “Drop or select dimension” button in the ROWS panel and select the “Category selection” dimension.

- The categories will now appear in the report next to the “Search term” column.

^^^ Note that if you see (not set) in the data, it simply means that the search data was captured before we introduced the tracking of this new parameter.
To also view “Subcategories” in the report:
- In the “Tab settings” column, click the “Drop or select dimension” button in the ROWS panel and select the “Subcategory selection” dimension:

- The subcategories will now appear in the report next to the “Category” column.

Note that you can replace the “Category selection” or “Subcategory selection” dimensions with any of the other dimensions in the table above (assuming they are configured in your Google Analytics account).
Filtering to specific “Categories”
If, for example, you only want to display searches assigned to a specific “Category”, then you must add a FILTER. We’ll use the “Business” category as an example.
- In the “Tab settings” column, click the “Drop or select dimension or metric” button in the FILTERS panel and select the “Category selection” dimension:

- In the filter, select the match type, “exactly matches”, and the expression, “Business”. The “Business” expression must match the category name.

- Once set, click APPLY.
- The report will now only display searches made with the “Business” category selected.

Note that you can extend filter granularity and only display searches under a particular “Subcategory” by adding the “Subcategory selection” dimension into the FILTER panel and entering the subcategory name as the expression.
- - -
Why is analysing “searched keywords” so important?
Firstly, you need to understand whether those searches return positive results. If not, there is clearly an opportunity to:
- Add new assets or images that fit the keyword or search term requested.
- Broaden the metadata and keyword set on existing assets to better match those searched terms.
If matches are successful, there is still an opportunity to broaden the metadata and keyword set on existing assets to better match those highly searched terms.
In the end, it’s about analysing the information (data) and better servicing your users — making it easier and faster for them to go about their daily work.
If you’re not already using Google Anaytics to gain further insights into how your users are utilising your Brand Toolbox site, talk to our Professional Services team to get connected: info@synrg.com.au
To view the pages/screens most viewed on the site in any given period, select “Reports” from the left side menu bar and select “Engagement > Pages and screens”.

The report includes:
- Most viewed pages/screens
- Number of active users
- Average views per user
- Average engagement time
- Event count
User Acquisition
To view the number of new users who have engaged with the site in any given period, select “Reports” from the left side menu bar and select “Acquisition > User acquisition”.

The report includes:
- Number of new users
- Number of engaged sessions
- Number of engaged sessions per user
- Average engagement time
Traffic Acquisition
To view the traffic numbers engaging with the site in any given period, select “Reports” from the left side menu bar and select “Acquisition > Traffic acquisition”.

The report includes:
- Number of users
- Number of sessions
- Number of engaged sessions
- Average engagement time per session
- Number of engaged sessions per user
- Number of events per session
- Direct & Referral traffic
Next page: Tips and tricks
Back to top