Brand Toolbox houses a powerful image access and restriction tool.
You can restrict access to images in two very different ways:
- Image size and watermark restrictions (specific to member group)
Use this method if you want to restrict specific member groups to low or high resolution images, or to watermarked images only. - Image access restrictions (specific to image category)
Use this method if you want to prevent images in a specific image category to be accessible to select member groups.
Brand Toolbox allows you to use either of the image access and restriction mechanisms to suit your purpose. Combined together, the mechanisms create a very powerful image access and restriction tool.
Brand Toolbox allows the Administrator to set which image sizes a particular member group is allowed to access and download.
The options are:
Watermarked images
- Low resolution images only (Small: 630px), OR
Non-watermarked images
- Low resolution images (Small: 630px and Medum: 1200px), AND/OR
- High resolution images (Large: 2400px or Original uploaded files), AND/OR
- Custom image sizes.
Note that these are broad settings across all images and categories in the Photo library. For example, if a particular member group is set to view and download “Low resolution images” only, they will only be able to download low res images (Small and Medium) across the entire Photo library. They will see the options for Large and Original images (visualised by the exclamation marks below) but they are not allowed to download.

However, they are able to request high resolution images via an online Image Request Form attached to the image download buttons. The form is sent to the Image Administrator as an email for approval. Once approved, the member will then be allowed to download the high resolution image for the approved images only.
If a member group is not allowed to create and export custom image sizes, the “Custom size” button will be hidden from view.
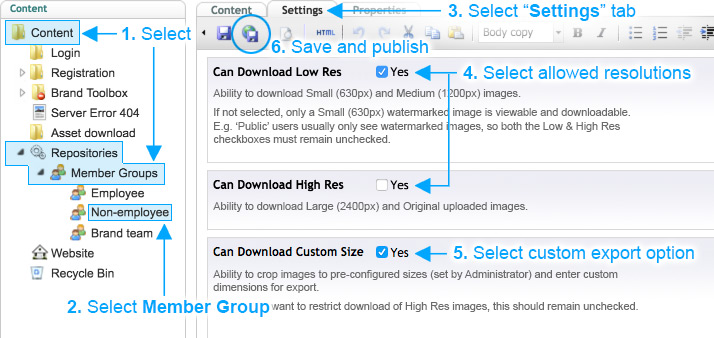
Setting the image access options
To set image access options:
- Go to: Content > Repositories > Member Groups
- Select the desired [member group]
- Select the “Settings” tab
- Check either, both or none of the image size checkboxes that the member group can access:
• Can Download Low Res
• Can Download High Res - Check/uncheck if the member group can crop and export custom image sizes:
• Can Download Custom Size - Click “Save and publish”.
Note that if none of the checkboxes are selected, then members from that member group will only be able to download low resolution (630px) watermarked images. They would need to request non-watermarked images.
Note: If you want to prevent the download of High Res images to a particular member group, the “Can Download Custom Size” checkbox should remain unchecked, as this does allow users to export at high resolutions.
Note also that the pre-configured image size options need to be input by the Brand Toolbox Development Team. To see the pre-configured list that ships with the software, view the Export custom image sizes & formats list.
“Public access” restrictions allow you to define which member groups are allowed to view the images within a specific image category.
When applied, all images within the specified category will be hidden from view. Note that if an image appears in several categories, and the member is allowed to view one of the two categories applied to the image, then the image will still be viewable under the permitted category.
![]()
Default settings
By default, Brand Toolbox makes all category nodes available to ‘Employee’ and ‘Non-employee’ Member Groups. Unless you specifically change this setting, all image categories inherit these access privileges. Note that you only need to change these settings when you want to block individual member groups from viewing specific image categories.
Restricting access to categories of images
You may decide to restrict access to a particular image category so it is viewable by ‘Employee’ member groups only. For example, you may have internal comms images and wish to exclude 3rd party or external suppliers (ie. Non-employees) from viewing the images.
To restrict access to the ‘Employee’ member group only, follow the procedure below:
- Right-click a category item (node) in the Content tree and select the Public access option in the actions/context menu.
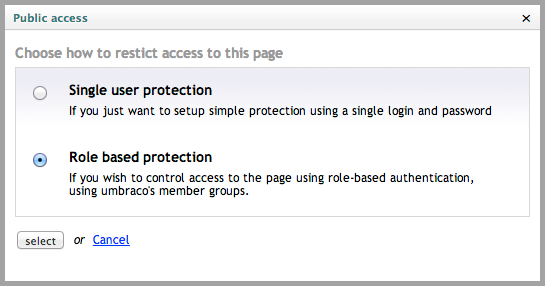
- The Public Access dialogue box appears.
- Select the Role based protection radio button and click Select.
- You will be presented with the Public access – Role based protection dialogue box. Select the member groups that you would like to have access to the images. You will see a list of all of the member groups for your site in the left hand list. You can use the ( >> ) or ( << ) buttons to move these groups to/from the right hand list. For an ‘Employee’ group user to be able view the page, it must appear in the right hand list.
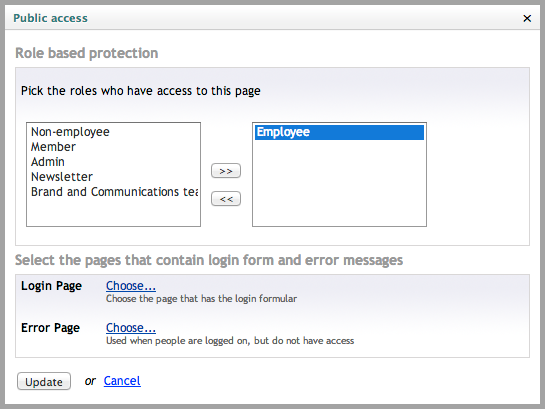
- Specify the Login Page where site users can enter their login details. If a user attempts to browse to the protected area of the site without first entering their login details, then they will be redirected to this page on your site:
- Choose the provided login page: Content > Login
- Specify the Error Page. This is the page that users are redirected to when they log in using incorrect credentials:
- Choose the provided error page: Content > Brand Toolbox > Error
- The dialog box should now have the following settings:
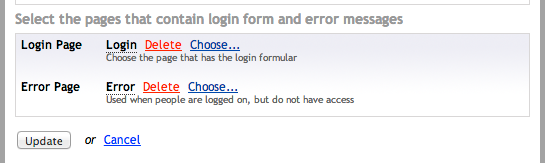
- Click the Update button to save your changes.
Next page: Photo consent forms
Back to top