![]() To display images on a page, they must first be uploaded to the Media section.
To display images on a page, they must first be uploaded to the Media section.
Unlike many other computer applications, a web page does not embed images. Instead, it links to the image stored on the web or media server. This means that if you delete an image from the Media section, it will also disappear from the page. The Working with images and files page outlines how to first upload your images to the Media section.
Note that unless renamed by your administrator, your site stores most of its usable guidelines images in the Media > Guideline display visuals folder.
Inserting an image from the Media library
- Place the cursor in the editor where you want to insert your image.
- Click the Media Picker button
 from the toolbar to open the Select media slide out panel.
 - Browse and select an image from the Guideline display visuals folder to reveal the image details. Note that when browsing the Media tree, selecting the text under the thumbnail in the media picker opens the folder (when it contains images) and clicking the thumbnail selects the image (as indicated with the green tick symbol).

- In the Alternative text field, enter an image description^.
- Image dimensions are automatically included when linking/adding an image. If the image is larger than the column width, it will be constrained to the column width (usually 630px or 300px, depending on a 1col or 2col template). You can change the size by entering a Width or Height in the provided fields or selecting the image and diagonally dragging the image handles down in size. The image will maintain its aspect ratio, so there is no need to enter both values.
- Click Submit to add the image.
If the image appears soft (not sharp) after inserting the image, use the following hack to sharpen it: Sharpening guidelines display images
^ For a variety of reasons, some visitors will not be able to see the images on your site. People who are visually impaired can ‘read’ web pages using various accessibility tools, however, images are often difficult to ‘read’. So that these groups of people can understand what an image represents, it is important to provide a text option where the image is described in words.
Inserting an image from your computer
- Place the cursor in the editor where you want to insert your image.
- Click the Media Picker button from the toolbar to open the Select media slide out panel.
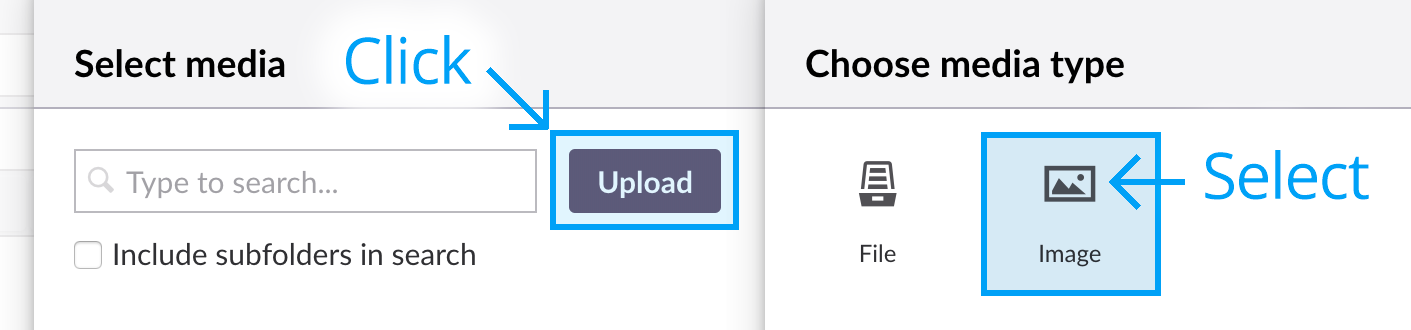
- Click the Upload button, select the image to be uploaded from your computer, then choose the Image media type.
- Click Submit to add the image to your page.
Note: Though we allow you to upload an image from your computer directly to a page, we prefer you first upload images to the Media section. This allows you to better manage the images into a more intuitive folder structure.
Deleting an image from the page
If you want to delete an image from the page, simply select the image and press Delete on your keyboard. The image disappears from the page but is not deleted from the Media library.
Next page: Macros
Back to top