There are several workflows to approve registration requests; automatically (via the ‘frontend’ approval process), or manually (via ‘backoffice’ approval mechanisms).
Each workflow requires Access Administrators to be configured to approve the requests.
Setting up Access Administrators
It’s important to understand that there are multiple ways to assign Access Administrators (e.g. people who can approve registration requests). Approvers can either be “Frontend” MEMBERS or “Backoffice” USERS. The differences are described below...
“Frontend” Access Administrator MEMBERS
Frontend “Access Administrators” are representatives who are chosen to approve registration requests. They are sent an email notification^^ whenever a new registration request is made, and can approve or reject a request via the link on the email. The “Access Administrator” is usually a member of the Brand or Marketing Teams, and individual or multiple access admins can be assigned to receive the registration requests.
Note that “Frontend” Access Administrator MEMBERS can approve or reject registration requests without logging into the backoffice. However, once a request has been approved or rejected, the frontend Access Administrator cannot revert the action. The action can only be reverted or changed by a “Backoffice” Access Administrator USER.
^^ Note that at least one “Frontend” Access Administrator MEMBER must be configured for the notification emails to be sent.
Further info:
- Learn how Access Administrators can automatically approve registrations through the “Registration requires approval workflow”.
- Configure the “Registration email approval settings” to allow Access Administrators to automatically approve registrations.
“Backoffice” Access Administrator USERS
“Backoffice” Access Administrator USERS hold higher privileges than “Frontend” Access Administrator MEMBERS and have access to more sensitive registration and membership data.
Though “Backoffice” Access Administrators are not sent a notification email whenever a new registration request is made, they can see a list of all active, pending, expired and rejected requests and activate them via the backoffice.
Therefore, creating a “Backoffice” Access Administrator USER is useful for viewing all active or pending requests, and to make manual changes such as reverting an incorrectly approved request.
Further info:
- Learn more about the “Registration requires approval workflow”.
Manual Approval Workflows
Via the Members section:
Privileged Approvals dashboards:
If the “Frontend” Access Administrator MEMBER does not receive the final access approval email (to approve a registration) or if a registration approval is needed urgently, the “Backoffice” Access Administrator USER can manually approve the new registrant as follows:
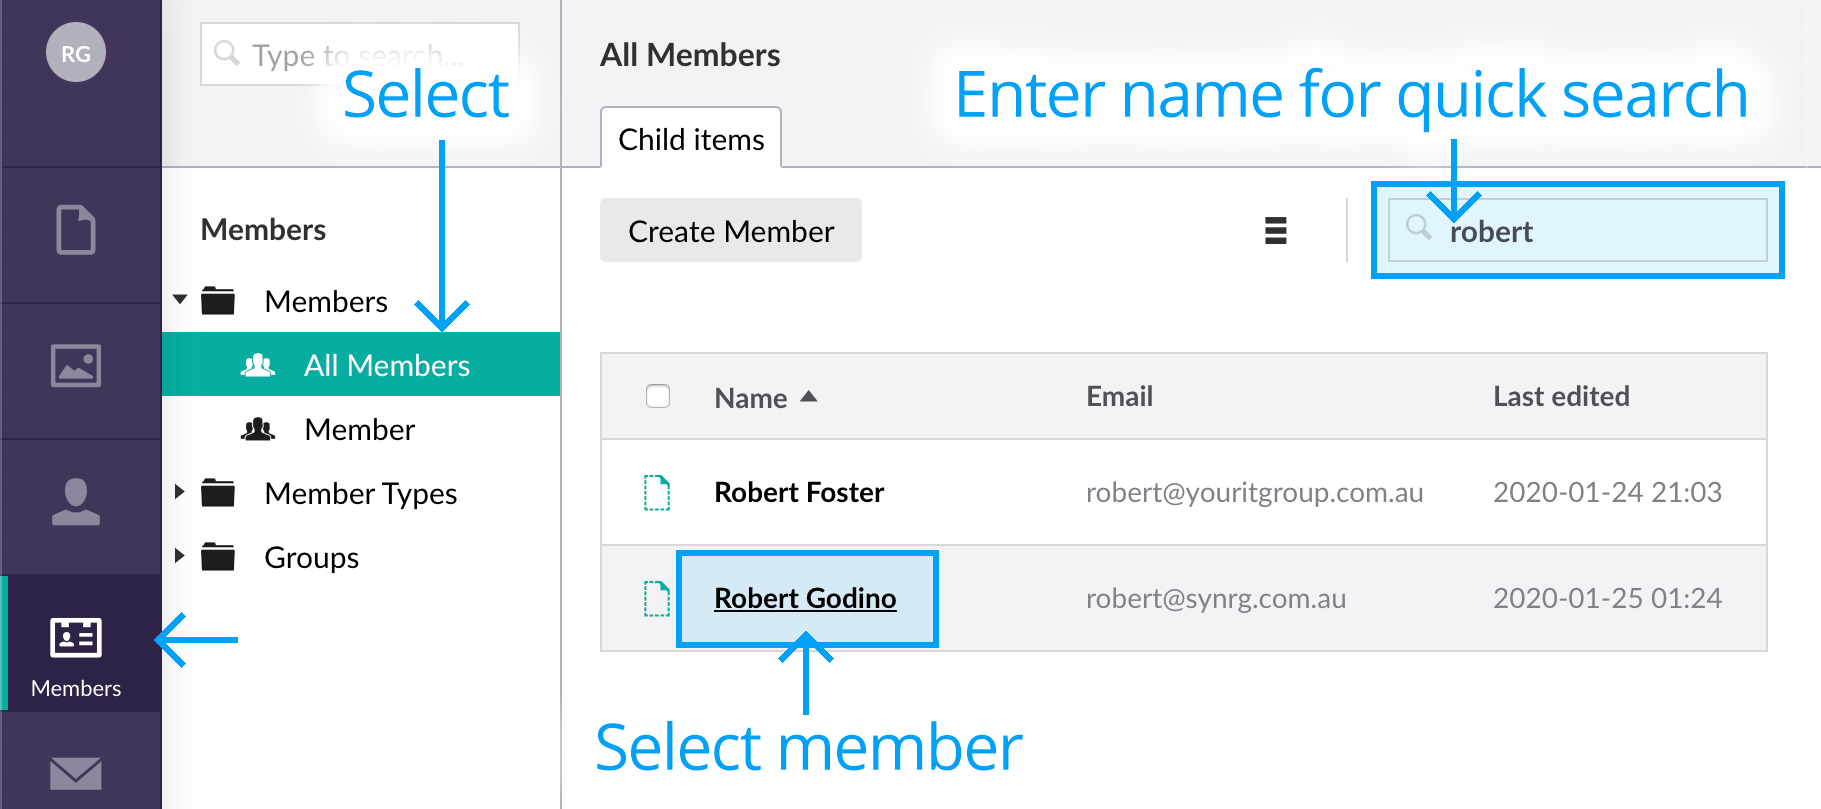
- Go to the Members section of the Admin area and select All Members.
- Enter name in the search field to quickly find the member. The list is sorted alphabetically by ‘Firstname’. Select the member.
- Select the ‘Properties’ tab.
- For a member to be active and a registration approved, the following two fields must be toggled on:
• Verified — Indicates the application has passed email authentication.
• Is Approved — Indicates the ‘Access Administrator’ has approved the registration or that the approval was allotted automatically based on assigned member workflow.
Additionally, the following two properties must meet this criteria:
• Account Expiry — Ensure the date has not expired and adjust accordingly.
• Is Locked Out — Ensure the account is not locked. This can occur after five^ (5) successive unsuccessful password attempts. If locked out, simply toggle on ‘Is Approved’.
^ Number may differ for each customer (default=5). Can adjust in web.config: maxInvalidPasswordAttempts="5".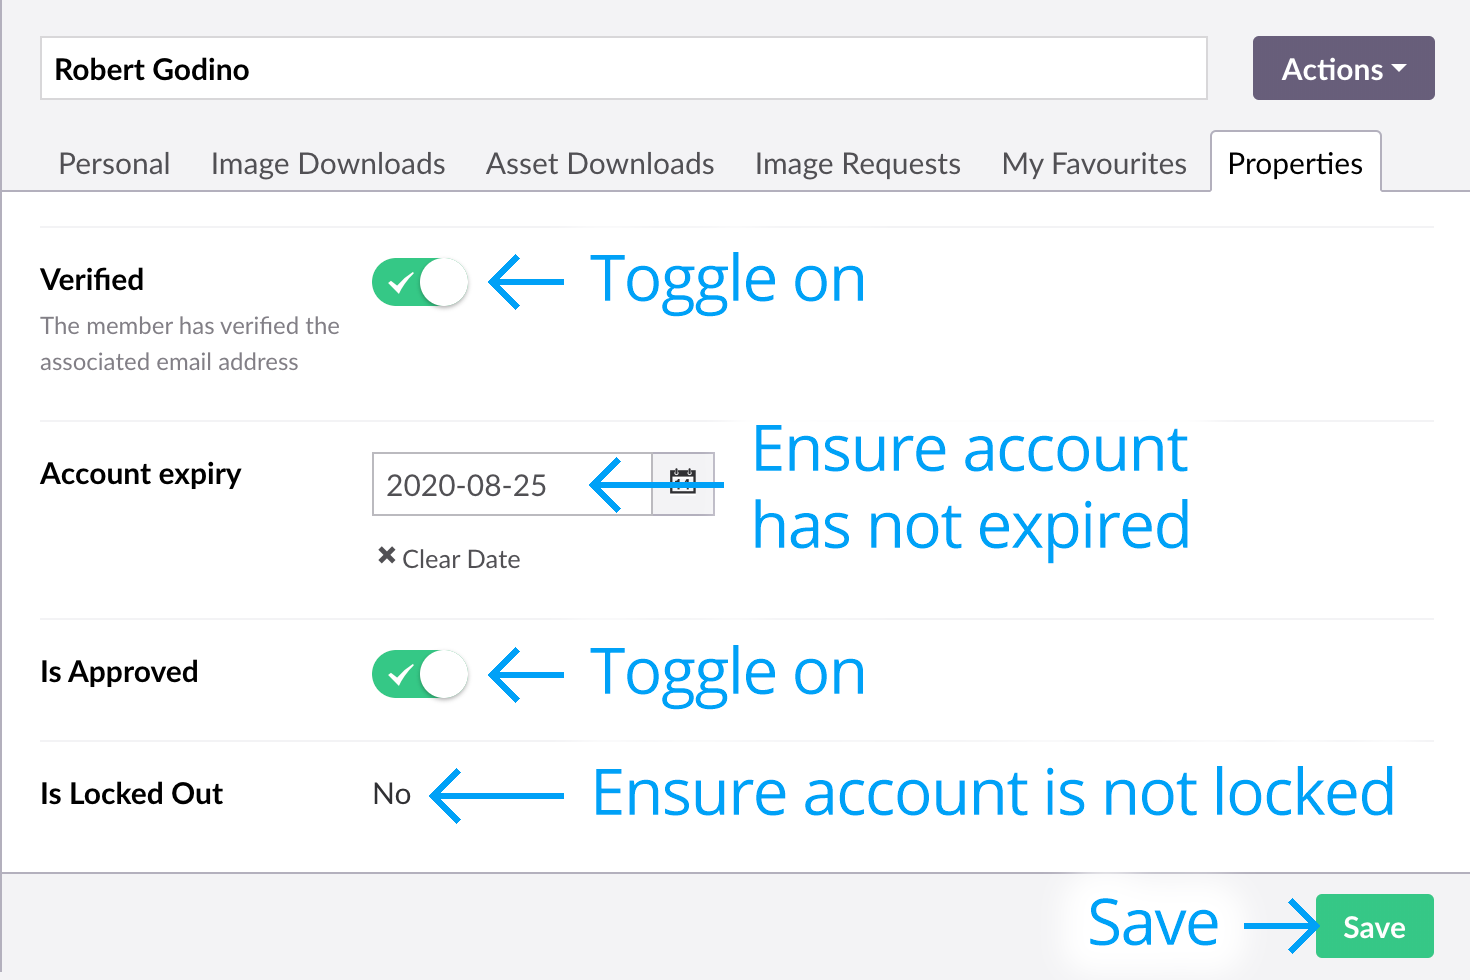
- Click SAVE to enable account.
* Note that when manually approving a user with the process above, the registrant does not receive a confirmation email, so ensure you let them know (via email) that their application has been approved.
Escalating member group from ‘Employee’ to ‘Brand Team Admin’
To escalate the status of an already registered ‘Employee’ to a ‘Brand Team Admin’ Member Group type, follow the instructions below:
- Go to the Members section of the Admin area and select All Members.
- Enter name in the search field to quickly find the member. The list is sorted alphabetically by ‘Firstname’. Select the member.
- Select the ‘Properties’ tab.
- Click the ‘Brand Team Admin’ member group to move the member group from the ‘non-approved’ list...
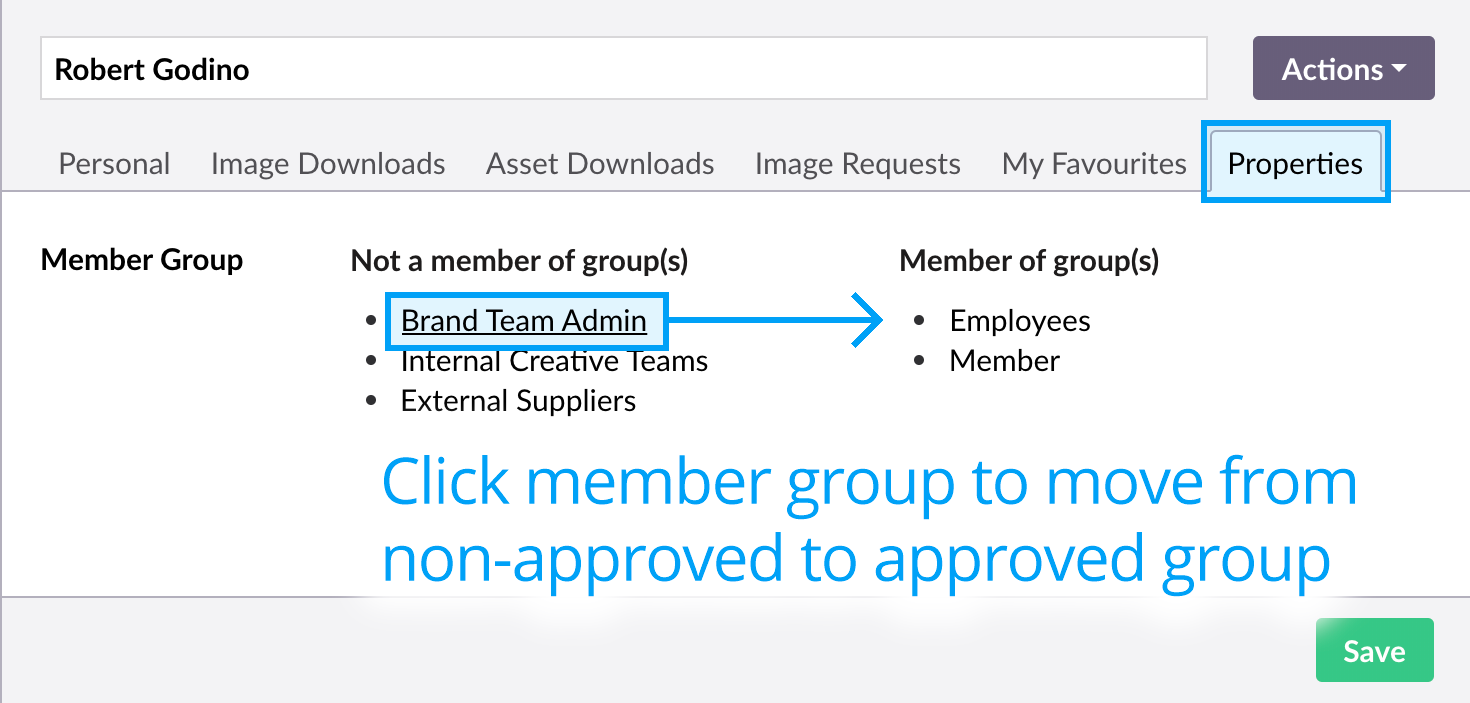
... to the ‘approved’ list.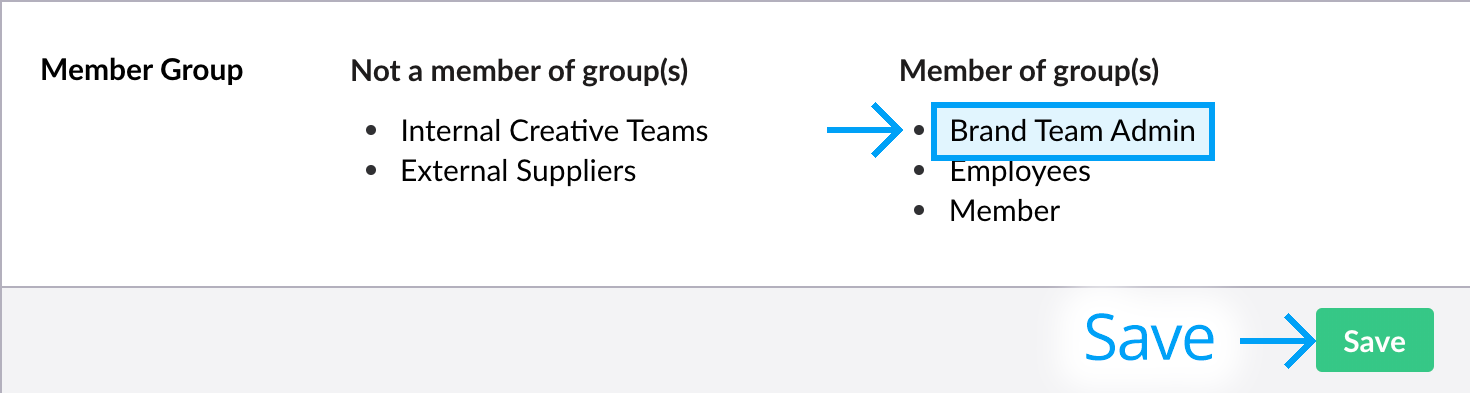
- The member is now assigned to the chosen group. Click SAVE to enable changes.
Note: To remove a member from a member group, just click the member group in the ‘approved’ list so it appears in the ‘non-approved’ list.
Last updated: 6 February 2020
A list of all active, pending, expired and rejected registration requests is available in the backoffice.

The dashboard allows selected “Backoffice” USERS to view all registration requests, approve, reject or delete “Pending” registration requests, or to reject or delete previously “Approved” requests.
Note that not all backoffice Administrators and Editors will be able to access the registration requests tables, as they will only be made available to selected backoffice users. Please also note that this “backoffice” approvals mechanism is different to the process that allows “Frontend” Access Administrator MEMBERS to be notified whenever a registration approval is requested. For help on setting up frontend “Access Administrators”, please view the info in the “Site settings > Member Groups > Registration Email Approval” section.
For a definition of the different Access Administrator types, please read the “Setting up Access Administrators” info above.
The Registration Requests dashboards
The backoffice registration requests lists are found on the “Registration Requests” tab of the root “Content” section:
~/Content [section] > Content [root node menu heading] > Registration Requests [tab].
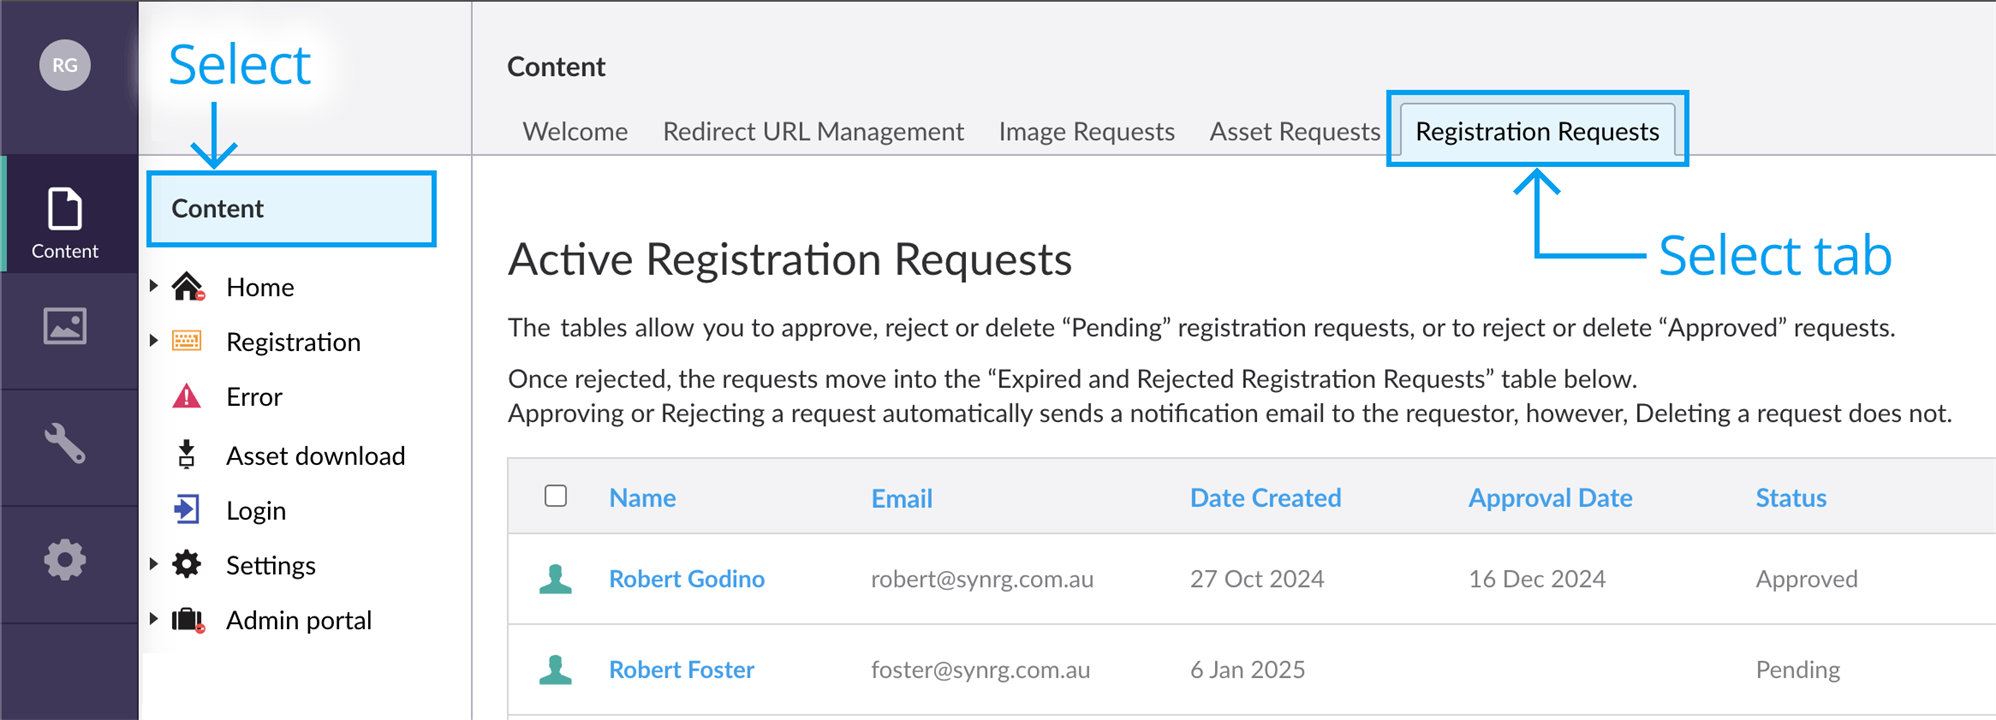
If you cannot see the tab, please view the “Accessing the Registration requests dashboards” section below or contact your site administrator to provide access.
There are two registration requests tables:
- Active Registration Requests
- Expired and Rejected Registration Requests
Active Registration Requests
This table lists all “Approved” and “Pending” registration requests. It allows you to approve, reject or delete “Pending” registration requests, or to reject or delete previously “Approved” requests.
Approving a “Pending” registration request automatically sends a notification^ email to the requestor.
Rejecting a “Pending” registration request or a previously “Approved” request automatically sends a notification^ email to the requestor and allows you to provide a rejection reason. Once rejected, the request moves into the “Expired and Rejected Registration Requests” table outlined below.
Deleting a “Pending” or previously “Approved” request DOES NOT send a notification^ email to the requestor. Once deleted, the record cannot be retrieved and the member profile is deleted. Therefore, the member will be required to re-request access via the frontend registration form. Note that deleting previously “Approved” records will result in members losing that “Approved” access.
^ Notifications are only sent when approving, re-approving or rejecting a registration request.
Important Note: Registration entries DO NOT appear in the active table prior to successful email verification. Note also that registrations from member groups that DO NOT require approval will not appear in the table.
Expired and Rejected Registration Requests
This table lists all “Rejected”, “Expired” and “Approved (Expired)” registration requests. It allows you to reactivate or delete a request.
Note that registration automatically move from an “Approved” state to an “Approved (Expired)” state when the requested access duration has expired. If needed, any expired or rejected requests can be “Re-approved” (e.g. reactivated).
Re-approving a “Rejected” or “Approved (Expired)” request automatically sends a notification^ email to the requestor and allows the Administrator to provide a reactivation (reuse) reason, change the access duration and add a new access start date.
Deleting a “Rejected” or “Approved (Expired)” image request DOES NOT send a notification email to the requestor. Once deleted, the record cannot be retrieved and the member profile is deleted. Therefore, the member will be required to re-request access via the frontend registration form.
^ Notifications are only sent when approving, re-approving or rejecting a registration request.
Selecting registration requests
Registration requests can be selected, approved, rejected or deleted individually or in bulk.
- To select multiple items, select the rows individually to highlight them. Reselect a highlighted row to deselect it or click the “Clear selection” button.
- To select all items, click the checkbox above the table or uncheck it to deselect all items.

Once selected (and depending on the type of request selected), the Approve, Reject and/or Delete buttons appear in the action bar above the table.
List items can be sorted (by Name, Email, Date Created, Status etc) by clicking the heading above each column in the tables.
Registration request details
Clicking the registrant’s name within the row reveals the “Registration Request Details” panel:
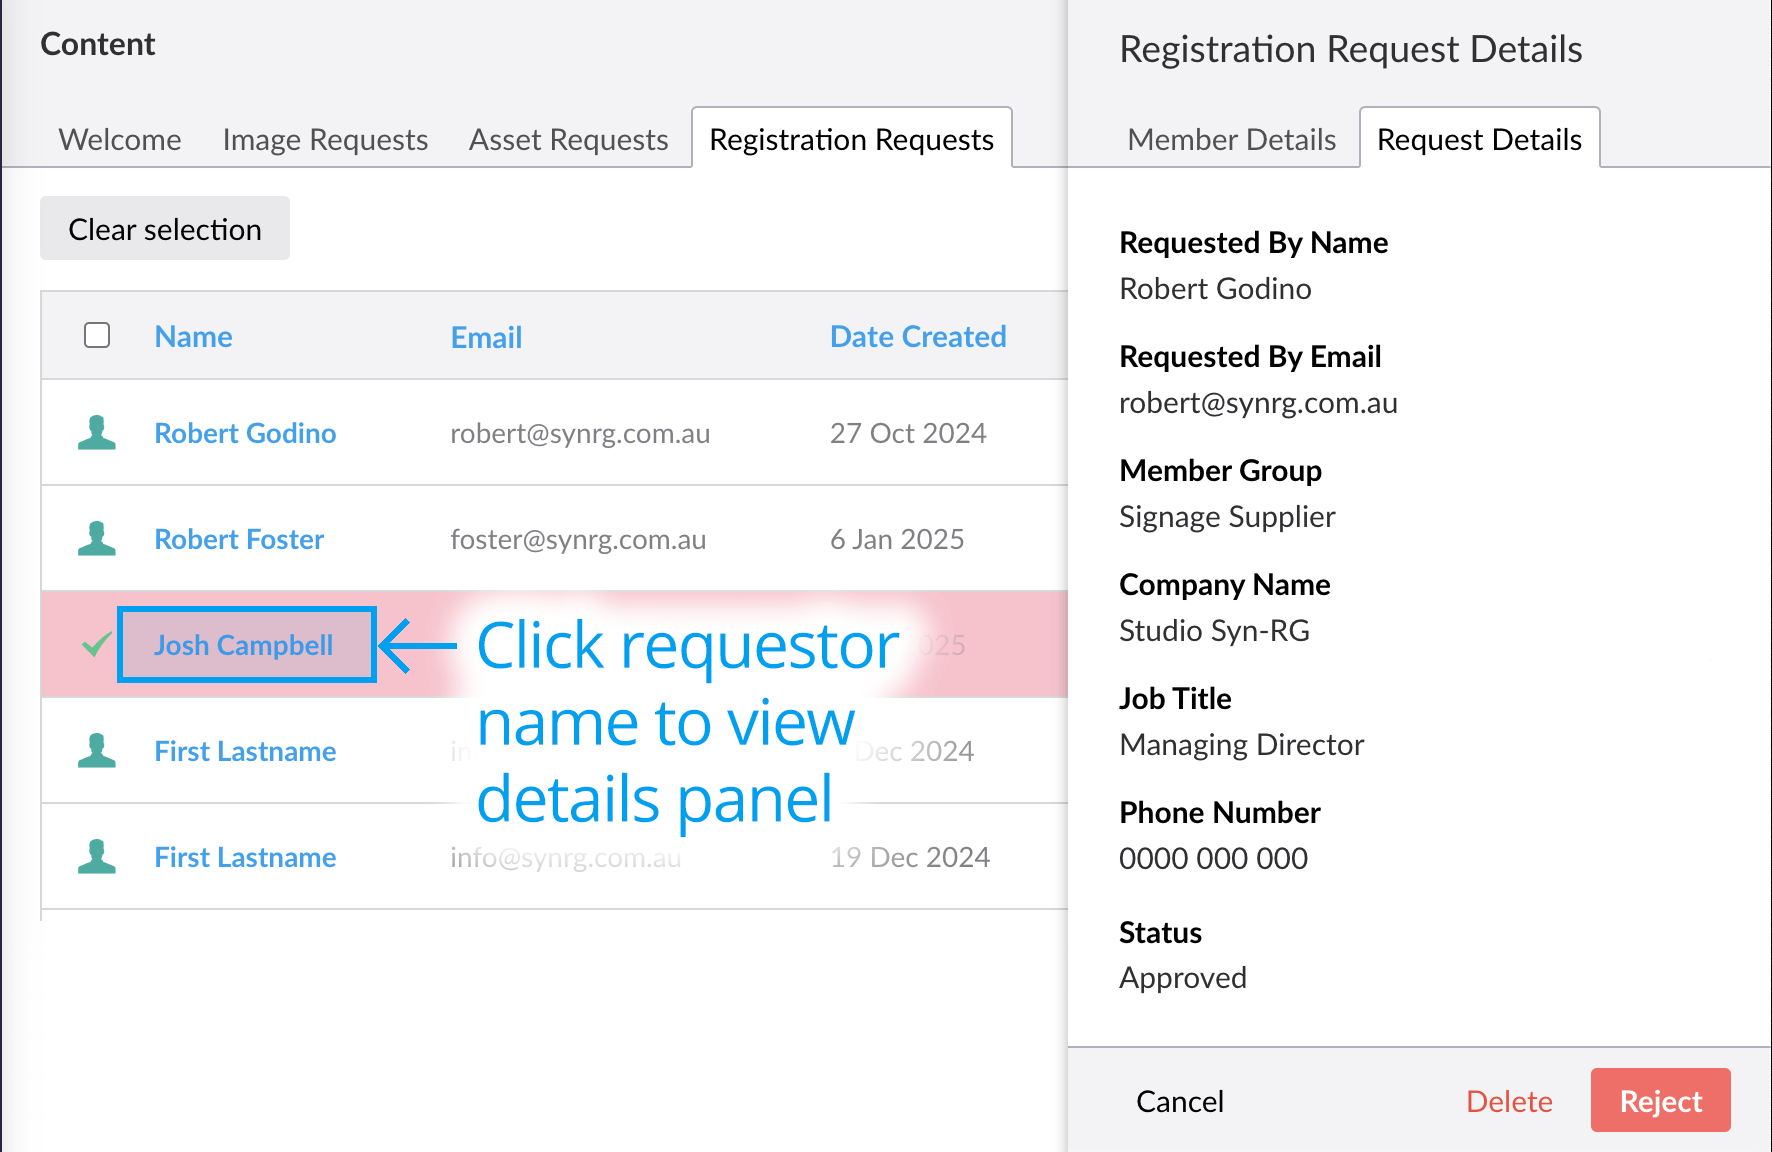
Recorded details include:
- Member Name
- Email Address
- Member Group
- Company Name
- Job Title
- Department (if applicable)
- Contact Phone Number
-
Referrer’s Full Name (if applicable)
-
Referrer’s Email Address (if applicable)
-
Referrer’s Phone Number (if applicable)
- Date Created
- Date Approved (appears after a request is approved)
- Approved By (name of the backoffice User or frontend Member who approved the request)
- Rejected Date (if applicable)
- Rejected By (backoffice User or frontend Member)
- Date Reapproved (appears when a request is re-approved)
- Reapproved By (backoffice User or frontend Member)
- Reapproval Reason (appears when a rejected or expired request is re-approved)
- Expiry Date
- Duration
- Status (e.g. Approved, Pending, Rejected, Expired)
The registration requests dashboards are only made available to selected backoffice users (Administrators and Editors).
To access, the “backoffice” USER must be linked to the “Registration Requests Dashboard” User Group. An Administrator (with higher privileges) can link the user to this group.
To link the user to the group, click the individual user in the “Users” section...

Thren, click “Add” under the “Assign access > Groups” panel:
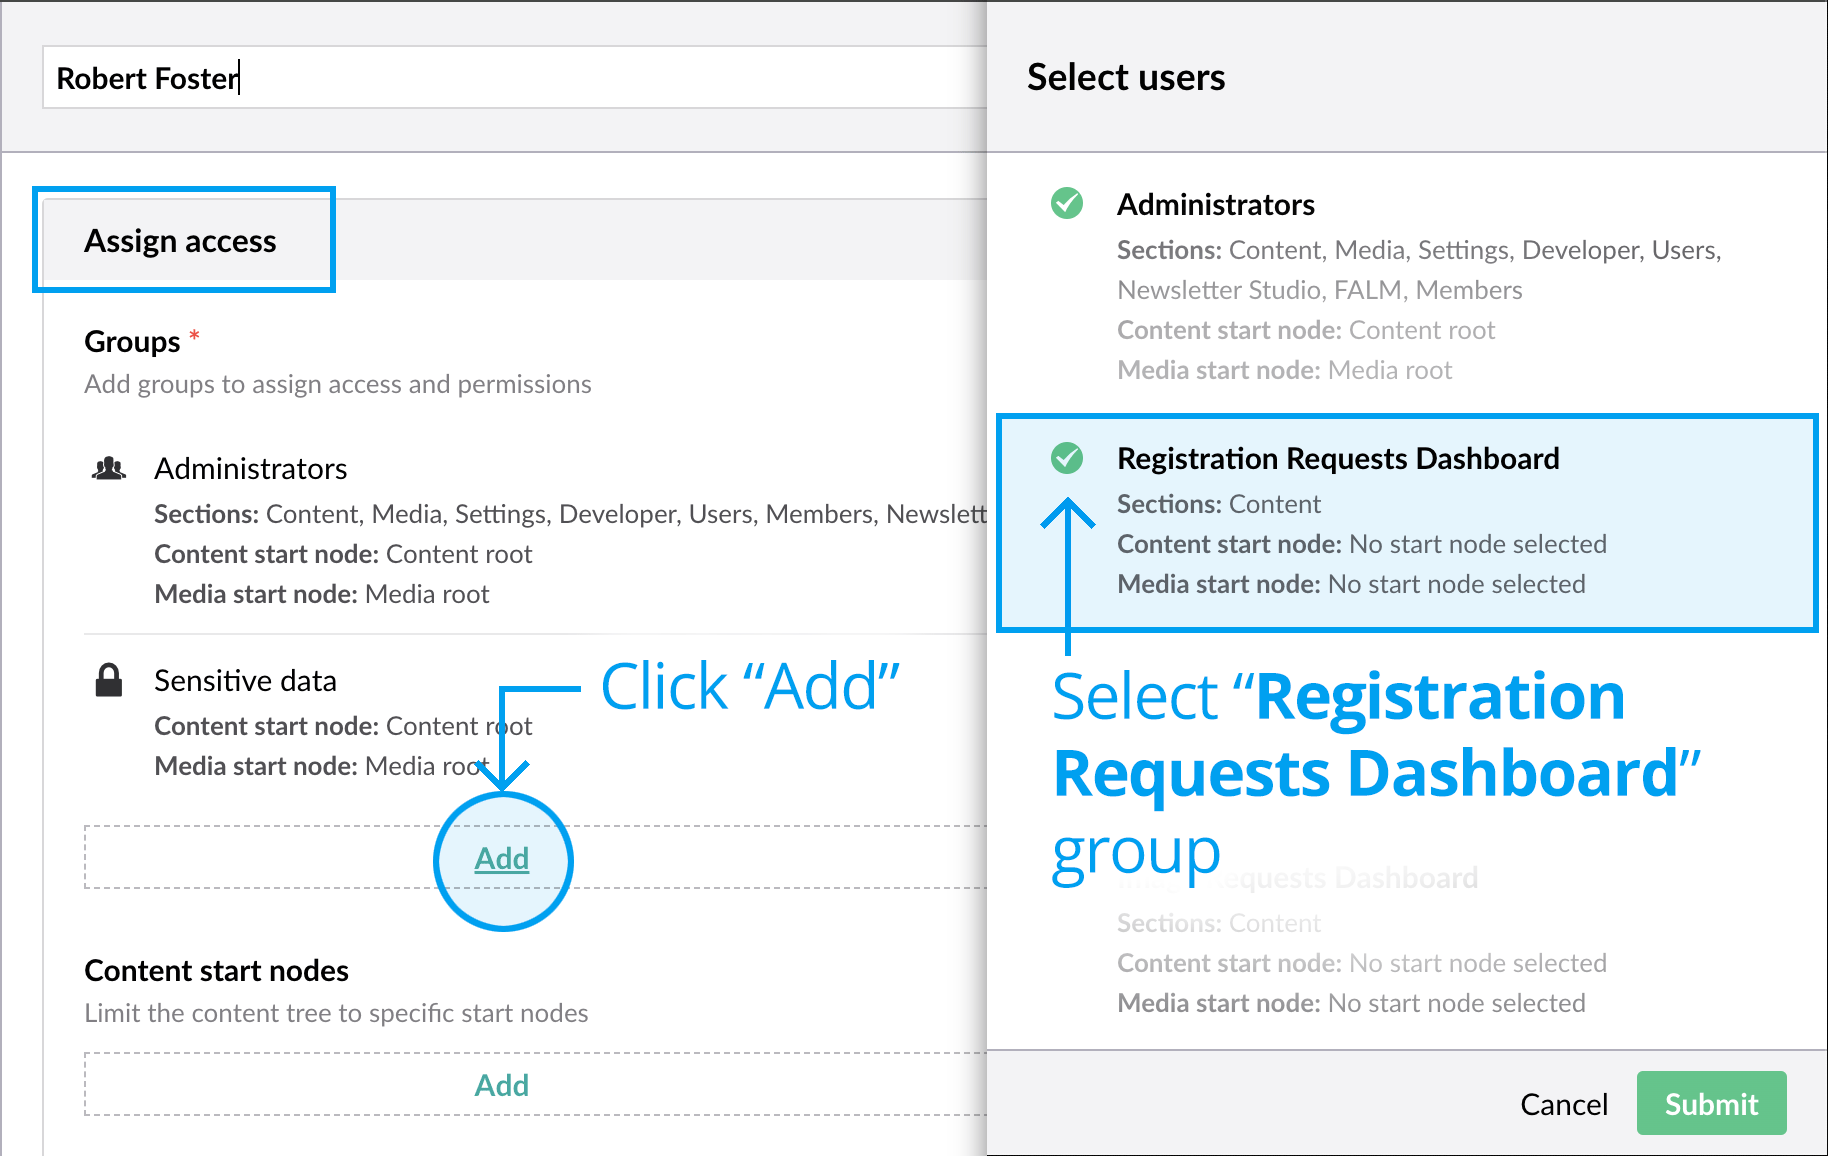
The “Select users” panel will appear with a list of all User Groups.
Select the “Registration Requests Dashboard” User Group and click “Submit”. Remember to click “Save” against the user profile. The user will now be able to view the Registration Requests dashboard in the Content section.
Next page: Troubleshooting member access
Back to top