Brand Toolbox lets you upload your files individually or in batches, using the “drag-n-drop” batch uploader.
On this page:
—
Grouping assets
If you have a group of files that you would like displayed together, they should reside in the same Assets Folder.
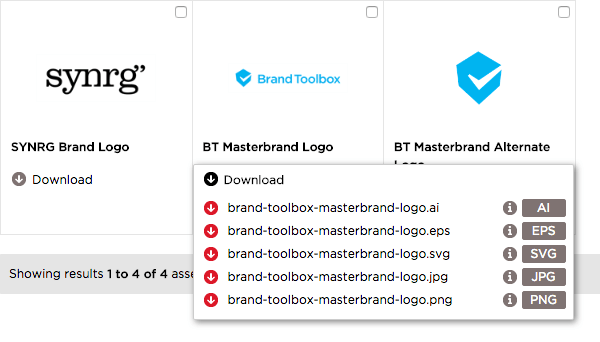
For example, you may have a logo which has multiple file formats:
- brand-toolbox-masterbrand-logo.ai
- brand-toolbox-masterbrand-logo.eps
- brand-toolbox-masterbrand-logo.svg
- brand-toolbox-masterbrand-logo.jpg
- brand-toolbox-masterbrand-logo.png
As they are variations of the same asset, you can just drag ‘n’ drop all of these files and upload them together into the same Assets Folder, so they display together in the Asset library search screen. E.g.
The Asset Library Batch Uploader should always be used per the instructions below:
Batch uploading multiple files
- In the Media > Asset library folder, select the folder where you would like to upload your assets.
- In the right hand content area, under the Contents tab, simply drag ‘n’ drop multiple files from your desktop into the upload area, or choose the ‘- or click here to choose files’ link.

- The Additional Meta Data slide out menu will appear, allowing you to enter asset meta data in bulk. It’s best to enter as much data into the Meta Data fields before upload, however, it can also be added later.

- In the Settings tab, you can choose to instantly publish the assets, or leave them unpublished while you continue editing data. Either way, remember to click Upload to complete the upload process.

- Note that the uploader will display a progress bar as it’s uploading, so please be patient until all assets are complete.

The following tables describe each of the different asset Meta Data properties.
‘Meta Data’ tab
| Property | Description |
|
Member Group permissions |
Select the Member Group(s) permitted access to VIEW and DOWNLOAD the asset. Only members of the chosen Member Group(s) will be given access to download the asset. |
|
Member Group Permissions View Only |
Select the Member Group(s) permitted to view asset details only BUT NOT download the asset. Members of the chosen Member Group(s) will need to complete a request form (and go through an approval process) to download the asset. Note that the email address of the Asset Administrator (e.g. the representative who is chosen to approve asset requests) can be assigned at Content [section] > Settings [node] > Permission Requests [tab] > “Asset Admin Emails” [property]. |
|
Brand |
Select the Brand or Sub brand associated with these assets. Related: Updating the default Brand values |
|
File format |
Select the File Format associated with these assets, e.g. Logo, Video, Illustration etc. Related: Updating the default File format values |
|
Orientation |
Select the Orientation associated with these assets, e.g. Landscape, Portrait, Square or Mixed (e.g. for packaged ZIP files containing assets of various orientations). |
|
Colour |
Select the Colour associated with these assets, e.g. RGB, CMYK, PMS etc. Related: Updating the default Colour values |
|
Usage Type |
Select the Usage Type restrictions associated with these assets, e.g. Restricted use, Copyright, No restrictions etc. Note that values will only appear if usage types have been created. |
|
Related Guidelines Page |
Select the Related Guidelines Page associated with these assets. Related guidelines pages are content pages within the CMS that relate to and add additional information to the selected asset. Related: Updating the default Related Guidelines Page values |
|
Keywords |
Enter keywords individually or copy/paste a keyword list, separating, keywords, and phrases, with commas. |
|
Comments |
Multi-line text field. |
|
Categories |
Assign single or multiple categories. If categories contain subcategories, please select the subcategory only. Only select the top-level category when there are no contained subcategories. |
‘Settings’ tab
| Property | Description |
|
Remember settings |
Checking this box remembers and records all the property values that were entered before clicking the “Upload” button. The recorded settings (values) then automatically pre-populate the properties the next time more assets are uploaded. These remembered settings are specific to each individual Editor/Administrator. The values can then be cleared by un-toggling the “Remember settings” property. |
|
Publish Assets |
Checking this box immediately publishes the assets and makes them viewable in the Asset library frontend. If you intend to continue editing meta data, leave this box unchecked. |
|
Asset Usage Expiry |
Setting an expiry date automatically archives the asset on the date set. |
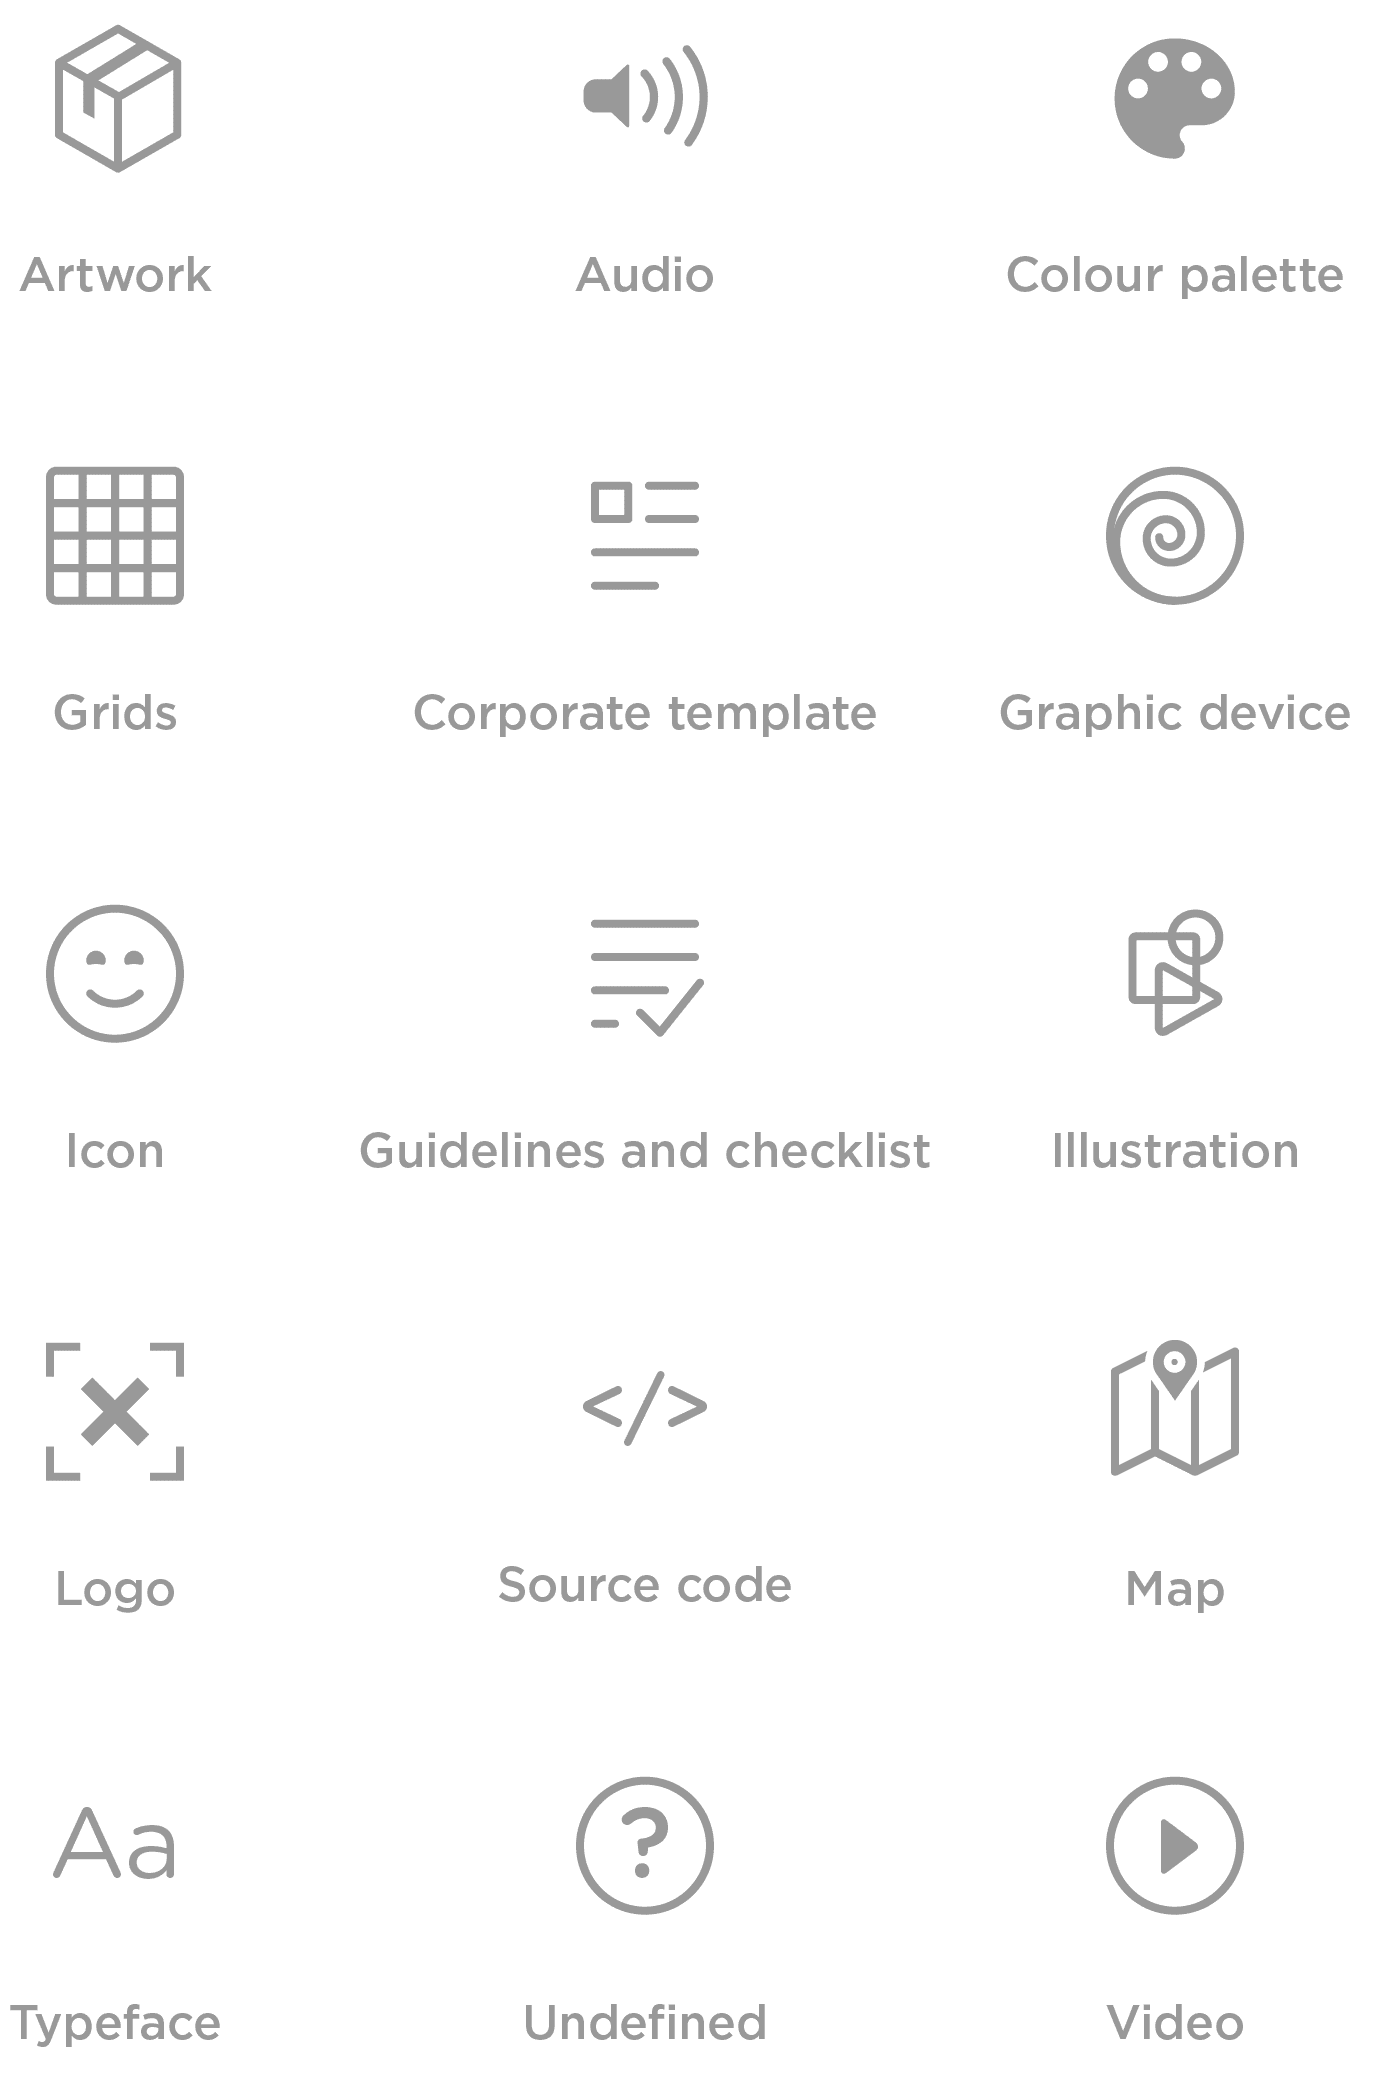
File Format and preview images
When uploading files using the asset uploader and a File Format is selected (e.g. Logo, Video, Illustration, Icon, etc), Brand Toolbox will first attempt to extract a preview image from the asset uploaded – assuming the asset is ‘image-based’. If it cannot extract a preview image, it will assign a ‘default’ preview symbol to the asset version rather than show a broken link (the default preview symbols are shown below).
However, instead of displaying the default symbols shown below, it is better practice to attach a more relevant image that visualises the asset to be downloaded. To add a new preview image, see ‘Updating existing asset version properties’ on the Updating asset versions page.
Default preview images/symbols
Last updated: 26 October 2023
Next page: Updating asset versions
Back to top