All new backoffice Administrators and Editors must first be invited to become a backoffice ‘User’.
The different User groups are usually pre-configured into your site before handover. And, depending on your site configuration, access to the backoffice is typically restricted to 1 of 2 access workflows:
- Username (email address) and password: Employees and/or External Suppliers
- Single Sign-On (SSO): Employees only
Therefore, before providing access to new users, please ensure you understand the ‘New User’ creation workflow and the user group you’ll be giving them access to.
Note: This page describes the workflow for assigning new users with Single Sign-On (SSO) backoffice access. If providing access via Username and Password, click:
Creating a new backoffice User with Single Sign-On (SSO) workflow
Step 1 – Invite user
The site administrator must first invite new users via the backoffice Users section. Once invited, the new user simply provides their own password to fulfil the application.
Follow these steps to invite a new user:
- Go to the Users section, ensure Users is selected from the user tree and click ‘Invite user’. Do not click Create user^^.

- Enter the new user’s Name and Email into the fields provided, and click ‘Add’ to assign them to a User group.

- Select the relevant user group and click Submit.

- It’s always good practice to add a clear invite message. To economise your time, ensure you have a message pre-stored so you don’t need to retype it evey time. Here’s an example:
Hi [FIRSTNAME], this is an invitation to the Brand Toolbox administrator backoffice (Umbraco Backoffice).
Please accept the invitation and provide a password when asked. Note that the password isn’t required every time you login. It will simply allow you to access the backoffice to complete the SSO integration for Backoffice Users.
Once you have logged in, click the profile icon at the top-left of screen (currently a circle with your initials in the purple section bar), then click the blue “Link your Active Directory account” button.
In future (and once logged out), you will then be able to sign in at the following address:
/umbraco
Regards,
Brand Toolbox Development Team
info@synrg.com.au
- Click Send invite to send the invitation.
Step 2 – User accepts invitation
- The invited user receives an email invitation.

- They simply need to click the acceptance link on the email invitation and create a password when asked.
- They are now logged into the backoffice admin area.
Step 3 – Link Active Directory account for SSO activation
-
Once the new user has logged in, they must link their company’s Active Directory account to their user profile to activate SSO.
-
They must click the profile icon (avatar) at the top-left of screen (currently a circle with initials in the purple section bar), then click the blue “Link your Active Directory account” button.
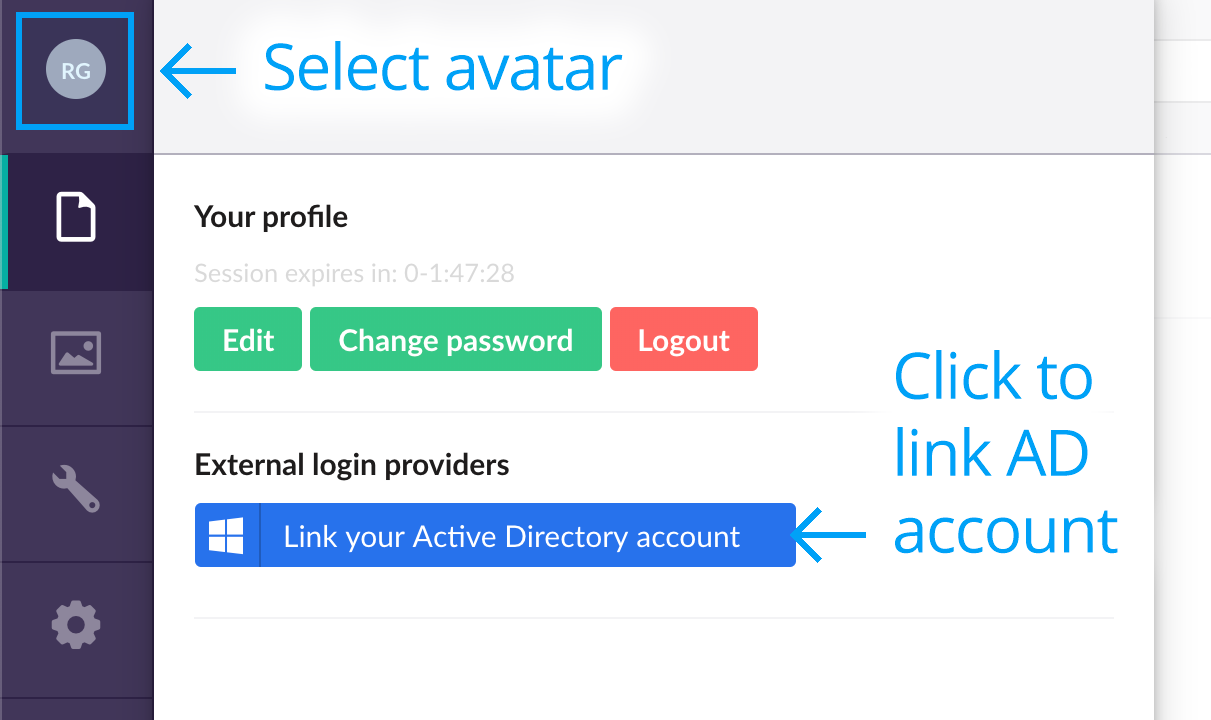
-
When prompted, they need to choose their company account profile.

-
Enter Active Directory account password.

- The new admin user has now successfully linked their company’s Active Directory** account to the Brand Toolbox backoffice user profile.
** Note: These screens may differ depending on the SSO Active Directory mechanism implemented by your organisation (e.g. the screens above display Azure AD).
^^ Note that there is also a Create user option under the Invite user menu. E.g.

This option is similar to the Invite user sequence, except that a password is automatically generated for the user rather than the user creating their own password.

Use this option when giving several people access to the same user profile (hence creating a shared password). An example of this is a Photographer Supplier user profile that may be shared by several approved photographers.