Image library settings can be configured here. The tab includes the following key properties:
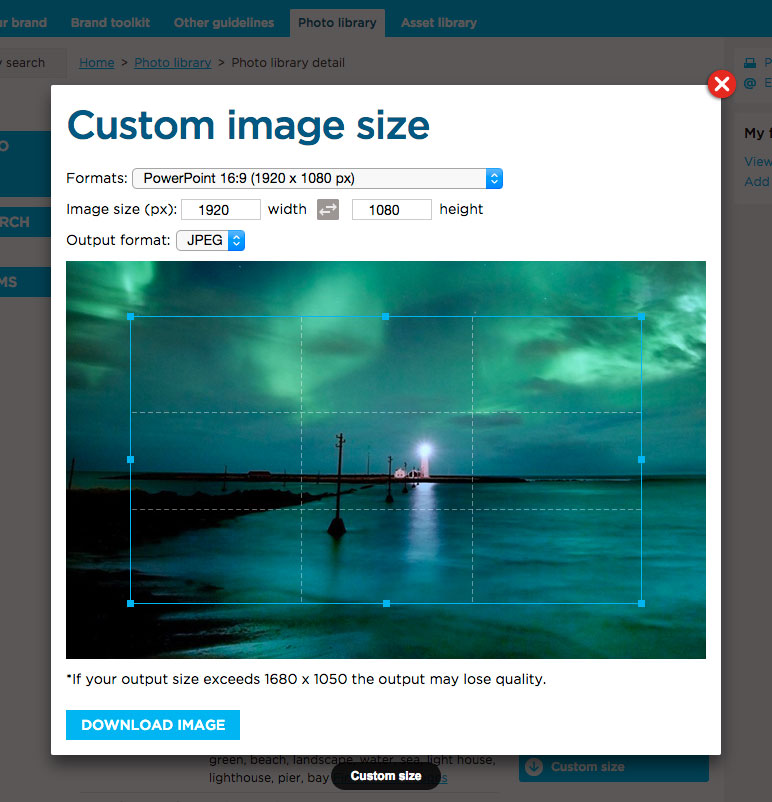
The Brand Toolbox Photo library “Custom image size” cropper allows members to resize and crop images to pre-configured sizes (set by the Administrator) or to enter their own custom dimensions. The resized images can be exported to JPEG/JPG or PNG formats.
To create your own custom sizes, view the Customising the defaut image sizes section below.
Default image sizes
Listed below are common business-centric and social media sizes that are shipped with Brand Toolbox. Note that this is only a small selection of available sizes – there are countless more (e.g. DL, A3, Business cards, Posters, Billboards etc). You can have as many options as your organisation, taxonomy and metadata structures require:
Presentations
- PowerPoint 16:9 (1920 × 1080 px)
25.4 x 14.05 cm
We opt for HD but a lower resolution 1280 x 960 px version is available. - PowerPoint 4:3 (1024 × 768 px)
25.4 x 19.05 cm - PowerPoint 16:10 (1920 x 1200 px)
25.4 x 15.87 cm
We opt for HD but a lower resolution 1280 × 800 px version is available.
Documents
- A4 (210 × 297 mm)
96 ppi - 794 x 1123 px (for Screen)
300 ppi - 2480 x 3508 px (for Print) - US Letter (8.5 × 11 in)
96 ppi - 816 x 1056 px (for Screen)
300 ppi - 2550 x 3300 px (for Print)
Social Media Posts
- Twitter Post (1024 × 512 px)
- Social Media (800 × 800 px)
- Facebook Post (940 × 788 px)
- Facebook App (810 × 450 px)
- Instagram Post (1080 × 1080 px)
- Pinterest Graphic (735 × 1102 px)
- Tumblr Graphic (540 × 810 px)
Social Media & Email Headers
- Email Header (600 × 200 px)
- Facebook Profile Picture (180 x 180 px)
- Facebook Event Cover (784 × 295 px)
- Facebook Cover (851 x 315 px)
Displays 820 x 312 px (computers) and 640 x 360 px (smartphones). We use 851 x 315 px as it displays best across all screens. (1640 px wide x 624 px high can be used for Retina display). - Facebook Photo Post (1200 x 900px)
- Facebook Slideshow (1280 x 720px)
- Facebook Photo/Canvas/Links (1200 x 628 px)
- Facebook Carousel (600 x 600 px)
- YouTube Thumbnail (1280 × 720 px)
- YouTube Channel Art (2560 × 1440 px)
- Twitter Header (1500 × 500 px)
- Linkedin Banner (1400 × 425 px)
- LinkedIn Post Header (700 x 400 px)
- Google+ Photo (1240 × 700 px)
- Tumblr Banner (3000 × 1055 px)
Digital Ads
- Facebook Ad (1200 x 628 px)
- Wide Skyscraper (IAB) (160 x 600 px)
- Medium Rectangle (IAB) (300 x 250 px)
- Leaderboard (IAB) (728 x 90 px)
- Large Rectangle (IAB) (336 x 280 px)
Film & Video
- HDTV 1080p (1920 x 1080 px)
- HDV/HDTV 720p (1280 x 720 px)
- HDV 1080p (1440 x 1080 px)
- DVCPRO HD 720p (960 x 720 px)
_
To customise the image crop selections on your instance of Brand Toolbox, view the Customising the default image sizes section below.
To configure your site to allow members to output their own custom sizes, view the Image restrictions and access help page.
Before editing the default crop sizes, please understand that the “Image crop formats” are contained within image crop “Groups”. The groups allow you to list common business-centric and social media sizes into easily recognisable groupings. Both the crop format and group name can be renamed and edited.

To add a new “Image Crop Format”:
- Select Content > Settings (node) > Image Library (tab). Note that the Image Library tab may be hidden within the arrow list to the far-right of the menu.
- Click the Group name or the Edit (pencil) icon next to the group name to reveal the existing image crop formats and click the (+) icon to add a new Image Crop Format.

- Enter an image crop format name in the Text field, and the Width and Height in pixels.
- ‘Save and publish’ after making the change.
The group name and the crop format names can also be edited in these screens.
To delete an “Image Crop Format” or “Group”:
- Select Content > Settings (node) > Image Library (tab). Note that the Image Library tab may be hidden within the arrow list to the far-right of the menu.
- Click the Group name or the Edit (pencil) icon next to the group name to reveal the existing image crop formats and click the Delete/Recycle bin icon.

- ‘Save and publish’ after making the change.
This property is a shortcut link to the Image Brands list found at: Content [section] > Settings > Lists [nodes] > Photo Brands [list item]. DO NOT remove it.
User guidance on editing the Photo Brands list can be found on the Asset and Photo lists page.
Image Request Form - Low/High Res Description
On the Image request form, the low and high resolution text descriptions change when you select either the High or Low res option. This text is now customisable in the backoffice at the following location:
Backoffice location: Content [section] > Settings [node] > Image Library [tab] > Image Request Form - Low Res Description and Image Request Form - High Res Description [properties]
Image Request Form: Duration Description
This text describes the conditions on the length of time requested that the image be available for.
Note that, if approved, the duration requested is also the time period that members are able to download the resolution sizes requested. After this time period, access to the additional image sizes will be retracted.
Do not delete the “Access: Min = [%minimum%] days, Max = [%maximum%] years” text from the field, as this data is automatically pulled into the field text and is dependent on the values specified below.
Image Request Form: Duration - Minimum (Days)
Specifies the minimum time period that the member is allowed access to the image, in days.
Range: 14 to 365 days
Image Request Form: Duration - Maximum (Years)
Specifies the maximum time period that the member is allowed access to the image, in years.
Range: 1 to 20 years
Image Request Form: Start Date - Maximum (Months)
Specifies the maximum time period from the image request date that the member is allowed to select as the “Start date” for access to the image, in months.
Range: 1 to 12 months (note that in most cases, there is no need to change this value from “12”)
Configuring Administrators to approve the image requests
More information on setting up the Administrator/s to receive the requests for approval can be found on the Settings node – Permission Requests tab section of the User Guide.
Alternatively, Administrators can be configured in the “Image Admin Emails” property at backoffice location: Content [section] > Settings [node] > Permission Requests [tab] > Image Admin Emails [property]
Next page: Asset library
Back to top